
Understanding the Paralives PC Controls Guide: A Complete Keyboard and Mouse Layout Explained is the key difference between struggling with the camera and truly enjoying the game as intended. Paralives is designed as a modern life simulation game where precision and control play a major role. Whether you are building homes, moving Parafolk, or experimenting inside Paramaker, every action depends on how well you understand the input system.
This guide simplifies everything so that even beginners can follow it without confusion. You will learn keyboard shortcuts, mouse controls, camera movement, Build Mode hotkeys, and how controller support fits into the overall system. By the end, you will no longer be guessing you will be controlling the game confidently and smoothly.
We will also cover the Paralives keyboard shortcuts list, explain Paralives mouse controls, and show how the full input system connects across Live Mode, Build Mode, Photo Mode, and Paramaker.
Paralives Pc Controls Overview
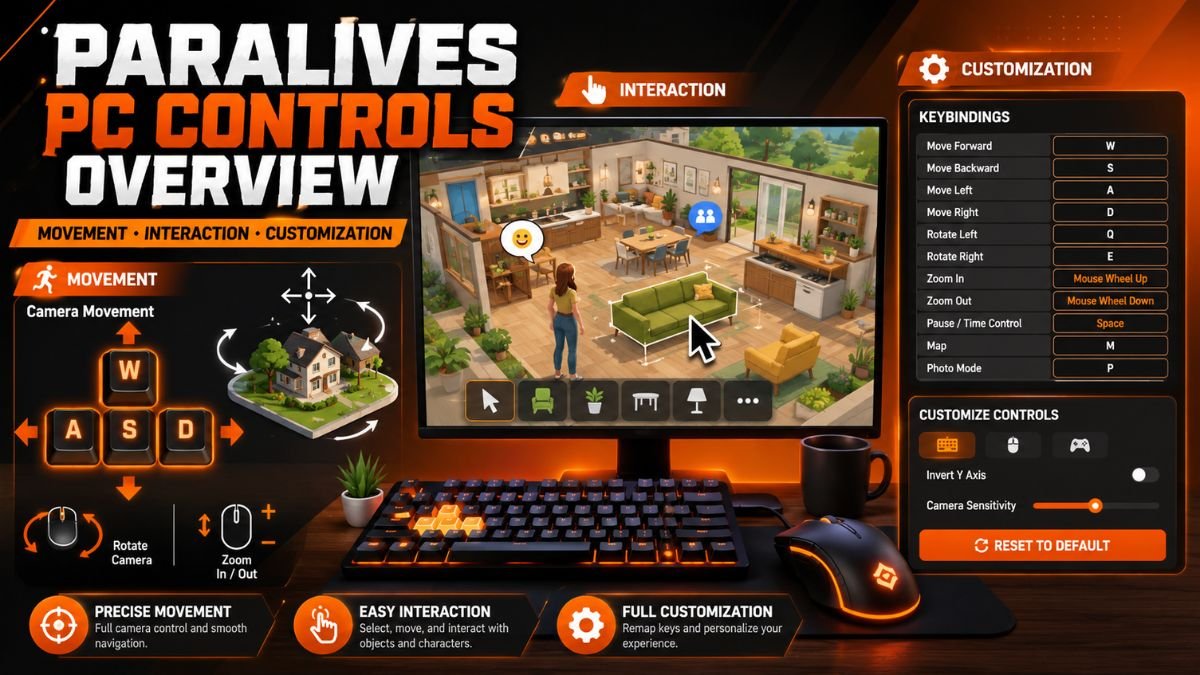
Paralives uses a flexible control system built around camera movement, object interaction, and customization. As a result, players are not restricted to a single control style, which makes the gameplay feel more fluid and creative. The system is designed so you can comfortably switch between exploring, building, and managing characters.
At its core, the controls focus on three key pillars: movement, interaction, and customization. Together, this structure ensures that every action in the game feels intuitive once you understand the basics. In addition, it allows players to fully personalize their input setup for better comfort and efficiency.
How Controls Work In Paralives?
Paralives uses a flexible input system designed around camera navigation, object interaction, and simulation control. Instead of this, the game does not lock players into one rigid scheme; rather, it allows layered control. You can move the camera using WASD, interact using mouse clicks, and perform advanced actions through keyboard shortcuts.
At its core, the system is built around three pillars: movement, interaction, and customization. First, movement handles the camera and Parafolk navigation. Next, interaction controls everything from selecting objects to triggering actions. Finally, customization allows you to change almost every keybind inside the settings menu.
This structure is similar to modern simulation games like The Sims, but with more freedom in camera movement and placement precision.
Keyboard And Mouse As The Primary Control Method
Paralives is designed primarily for keyboard and mouse gameplay on PC. To begin with, the keyboard handles movement, shortcuts, and mode switching, while the mouse is responsible for camera control, object selection, and placement.
In addition, the WASD movement controls are used for camera navigation, while the scroll wheel manages zoom. Right mouse button drag is typically used for camera rotation, giving players full 3D control of the environment.
As a result, this combination is important because Paralives is not a simple point-and-click game. It is a full simulation system where precision matters, especially in Build Mode and Paramaker, where object placement accuracy is critical.
Can You Customize Controls In Paralives?
Yes, Paralives includes a full Paralives input settings menu where players can remap nearly every control.
Inside the Key Bindings menu, you can:
- Change movement keys
- Remap camera controls
- Adjust Build Mode shortcuts.
- Modify interaction buttons
- Restore default settings anytime.
In addition, this is especially useful for players who prefer alternative layouts or laptop users who rely on trackpads instead of a mouse wheel. Overall, customization is one of the strongest parts of the system because it ensures accessibility for different playstyles and hardware setups.
Complete Paralives Keyboard Controls List
The complete keyboard layout includes essential shortcuts for smooth gameplay across all modes. Generally, players use WASD for camera movement, Space for pause, and Tab for switching modes. In addition, additional key actions like M for map and P for Photo Mode help streamline navigation. As a result, these shortcuts reduce UI dependency and allow faster control during gameplay sessions.
Essential Controls Every Player Should Know
To begin with, before going deeper, there are a few Paralives character movement keys and shortcuts every player should memorize:
- WASD or Arrow Keys for camera movement
- Q and E for camera rotation
- Mouse wheel for zoom
- Space for pause and time control
- Tab for switching modes
- M for Town Map
- P for Photo Mode
These are the foundations of gameplay. Without them, navigation becomes slow and frustrating.
Navigation Controls
Navigation controls handle how you move around the world. This includes both camera and world interaction.
In general, you can:
- .Move the camera using WASD or arrow keys. Enable edge scrolling for automatic movement.
- Click on the ground to move Parafolk to locations.
- Center the camera on selected characters instantly
As a result, this system is designed to keep gameplay smooth even in large maps like Melino, where exploration is key.
Interaction Controls
In essence, interaction controls define how you engage with objects and characters.
Common actions include:
- Left click to select objects or Parafolk
- Right-click to open interaction menus.
- Drag selection to group multiple Parafolk
- Click actions for movement commands
Overall, these controls are the backbone of the simulation experience. Without them, social interaction systems like Emotions system and Together Cards would feel disconnected.
Selection Controls
In comparison, selection in Paralives is more dynamic than in most simulation games.
You can:
- Click individual Parafolk for control.
- Drag-select multiple characters
- Manage household groups easily
- Switch focus between selected characters
This is especially useful during group activities where household members need to act together efficiently.
Quick Access Controls
To improve efficiency, quick access controls help reduce menu dependency.
- Tab switches gameplay modes
- M opens Town Map
- P opens Photo Mode
- Space pauses time instantly
As a result, these shortcuts are designed for speed. They reduce the need to constantly open UI menus, which keeps gameplay immersive.
Paralives Keyboard Layout Reference
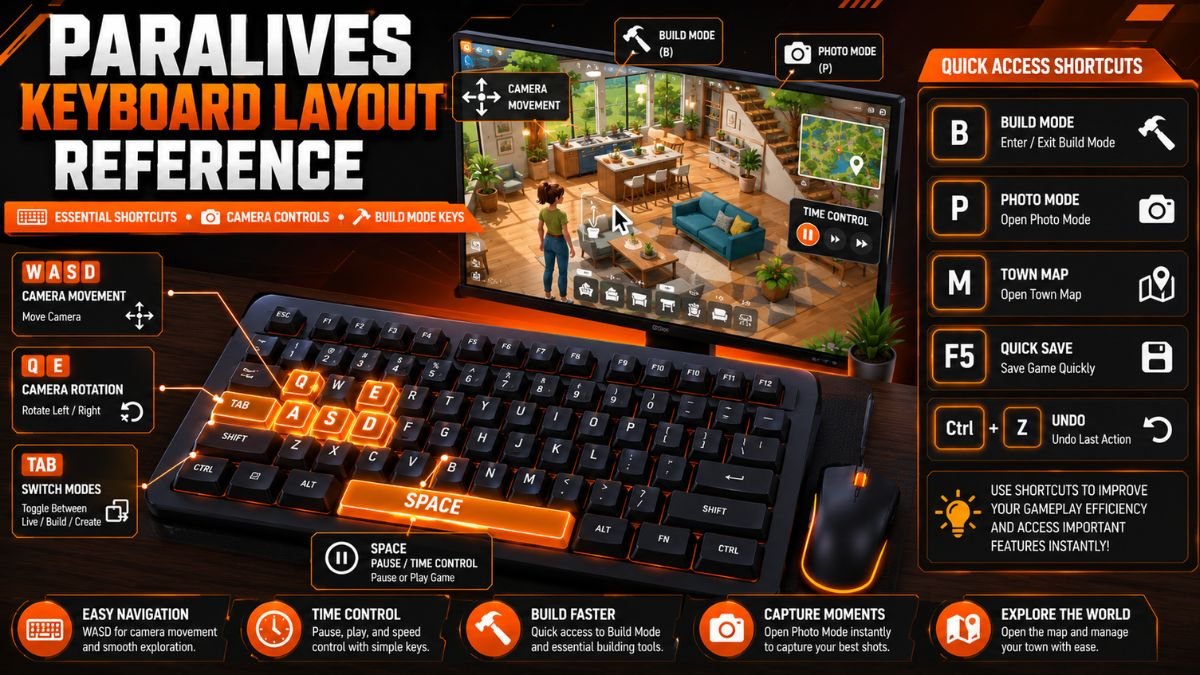
The keyboard layout in Paralives is built for both beginners and advanced players. Movement keys handle camera navigation, while function keys control time, building, and menus. Most important actions, like Build Mode, Photo Mode, and map access, are assigned simple single-key shortcuts. This ensures quick access without interrupting gameplay flow.
Movement Keys
To begin with, movement in Paralives is centered around camera control rather than character walking.
- WASD for camera movement
- Arrow keys as an alternative movement option
- Edge scrolling is optional in settings
Overall, this setup ensures both keyboard and mouse users can navigate comfortably.
Camera Keys
In general, camera control is one of the most important systems in the game.
- Q and E rotate the camera
- Mouse drag rotates the view
- The scroll wheel zooms in and out
- The middle mouse button supports panning
As a result, these controls are essential for building and exploration.
Time Control Keys
Time management is critical in simulation gameplay.
- Space pauses time
- Number keys control speed settings
- Fast forward options available in Live Mode
This helps players manage needs, system, jobs, and daily activities efficiently.
Build Mode Keys
To begin with, Build Mode is where Paralives becomes powerful.
- B opens Build Mode
- G toggles grid
- I uses pipette tool
- K activates the sledgehammer tool
- X rotates objects
Overall, these are core Paralives build mode keyboard shortcuts used for construction and design.
Utility And Menu Keys
In addition, utility keys improve workflow efficiency.
- F5 quick save
- Ctrl + Z undo
- Ctrl + Y redo
- M opens the map
As a result, these shortcuts are standard in modern PC games but are heavily used in Paralives due to frequent building and editing.
Screenshot And Photo Mode Keys
In particular, Photo Mode is one of the standout features.
- P opens Photo Mode
- Adjustable camera settings inside mode
- Depth of field and focus tools available
In addition, this connects directly to Paralives scroll zoom controls and cinematic camera systems used for screenshots.
Paralives Mouse Controls Explained
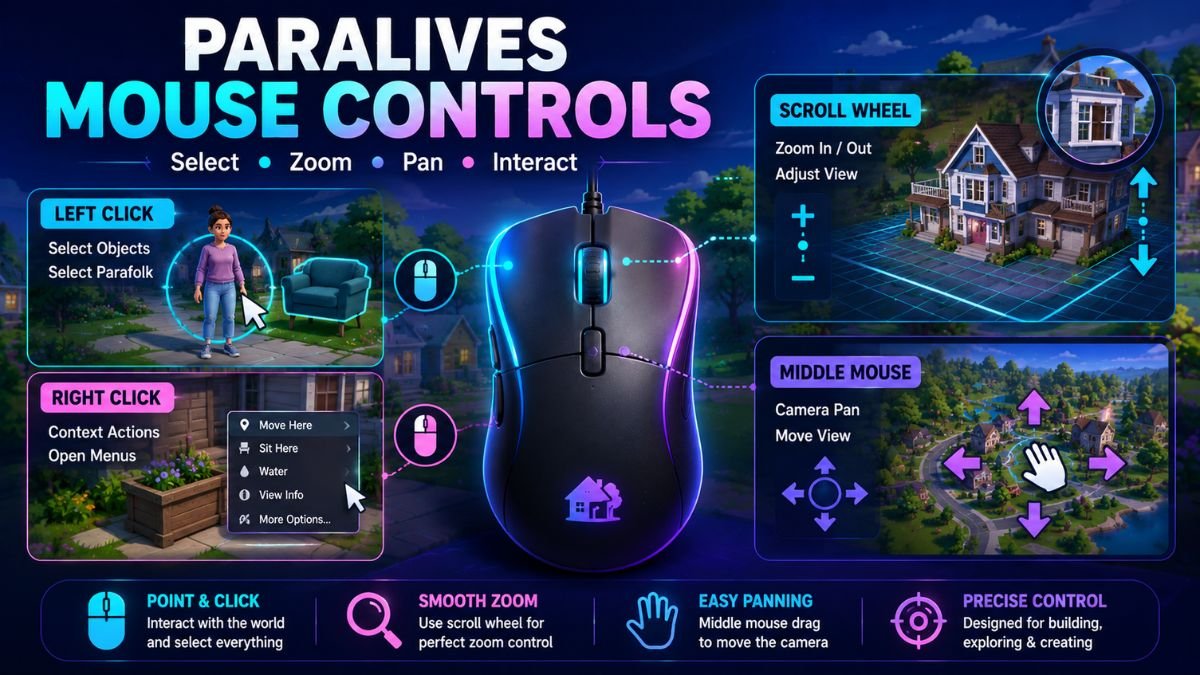
Mouse controls handle most in-game interactions, especially selection and camera movement. To start with, left-click is used for selecting objects and Parafolk, while right-click opens context actions. In addition, the scroll wheel controls zoom, which is essential for both building and exploring. Meanwhile, middle mouse drag helps with smooth camera panning across large areas.
Left Click Functions
To begin with, the left mouse button is the core interaction tool in Paralives. It is used for selecting Parafolk, clicking objects, and confirming actions inside menus. In most cases, the left click acts as the “primary action” input, meaning whatever you are trying to do in the world starts here.
For example, if you want to move a character, you click on them first, then choose an action. If you want to place furniture in Build Mode, you select the object with the left click and confirm placement in the world space. In addition, this is also tightly connected with Paralives’ mouse controls explained because the game relies heavily on precision clicking, especially when managing tight spaces in small homes or editing detailed interiors.
Right-Click Functions
In general, right-click is mainly used for context actions. Instead of opening full menus, it gives you quick options based on what you are pointing at.
For instance, if you right-click on a Parafolk, you can access social interactions, movement commands, or emotional responses tied to the Emotions system and Wants system. As a result, this makes gameplay faster because you do not need to navigate multiple UI layers. In addition, right-click is also important when managing interaction system behavior in Live Mode. It reduces unnecessary menu clutter and keeps the focus on real-time decisions.
Middle Mouse Button Actions
To begin with, the middle mouse button is often used for camera panning. This means you can drag the world around without rotating or zooming.
In particular, this becomes extremely useful in large builds or when exploring the Melino town map areas, where constant repositioning of the camera is required. Instead of resetting the view every time, you simply press and drag. As a result, it is a small feature, but it dramatically improves comfort during long play sessions.
Mouse Wheel Zoom Controls
To start with, the scroll wheel is responsible for zooming in and out of the world. This is part of the Paralives scroll zoom controls system and allows a smooth transition between wide overview and close detail views.
In particular, zooming is especially important when:
- Designing rooms in Build Mode
- Adjusting furniture placement
- Inspecting Parafolk’s facial expressions in Paramaker
- Capturing cinematic screenshots in Photo Mode
As a result, the zoom system is smooth and responsive, helping maintain control over perspective without breaking immersion.
Drag Controls And Object Manipulation
To begin with, dragging is used for selecting multiple objects or moving items across space. You can click and drag to:
- Select multiple Parafolk
- Move objects in Build Mode
- Adjust placement grids
- Resize selection areas
As a result, this becomes essential in Paralives build mode keyboard shortcuts workflow, especially when combined with snapping and grid placement tools. Object manipulation in Paralives is designed for precision, meaning small movements matter. That is why drag control is more sensitive than in traditional simulation games.
Mouse Controls In Different Game Modes
To begin with, mouse behavior changes slightly depending on the mode you are in. Each mode uses mouse controls differently. Live Mode focuses on selecting characters and triggering interactions, while Build Mode turns the mouse into a tool for placing and adjusting objects. Photo Mode uses mouse controls for cinematic camera movement, where lighting, angles, and composition become important.
As a result, this flexibility is what makes the input system powerful. Instead of learning separate controls for each mode, you adapt one system across all gameplay layers.
Paralives Camera Movement Controls
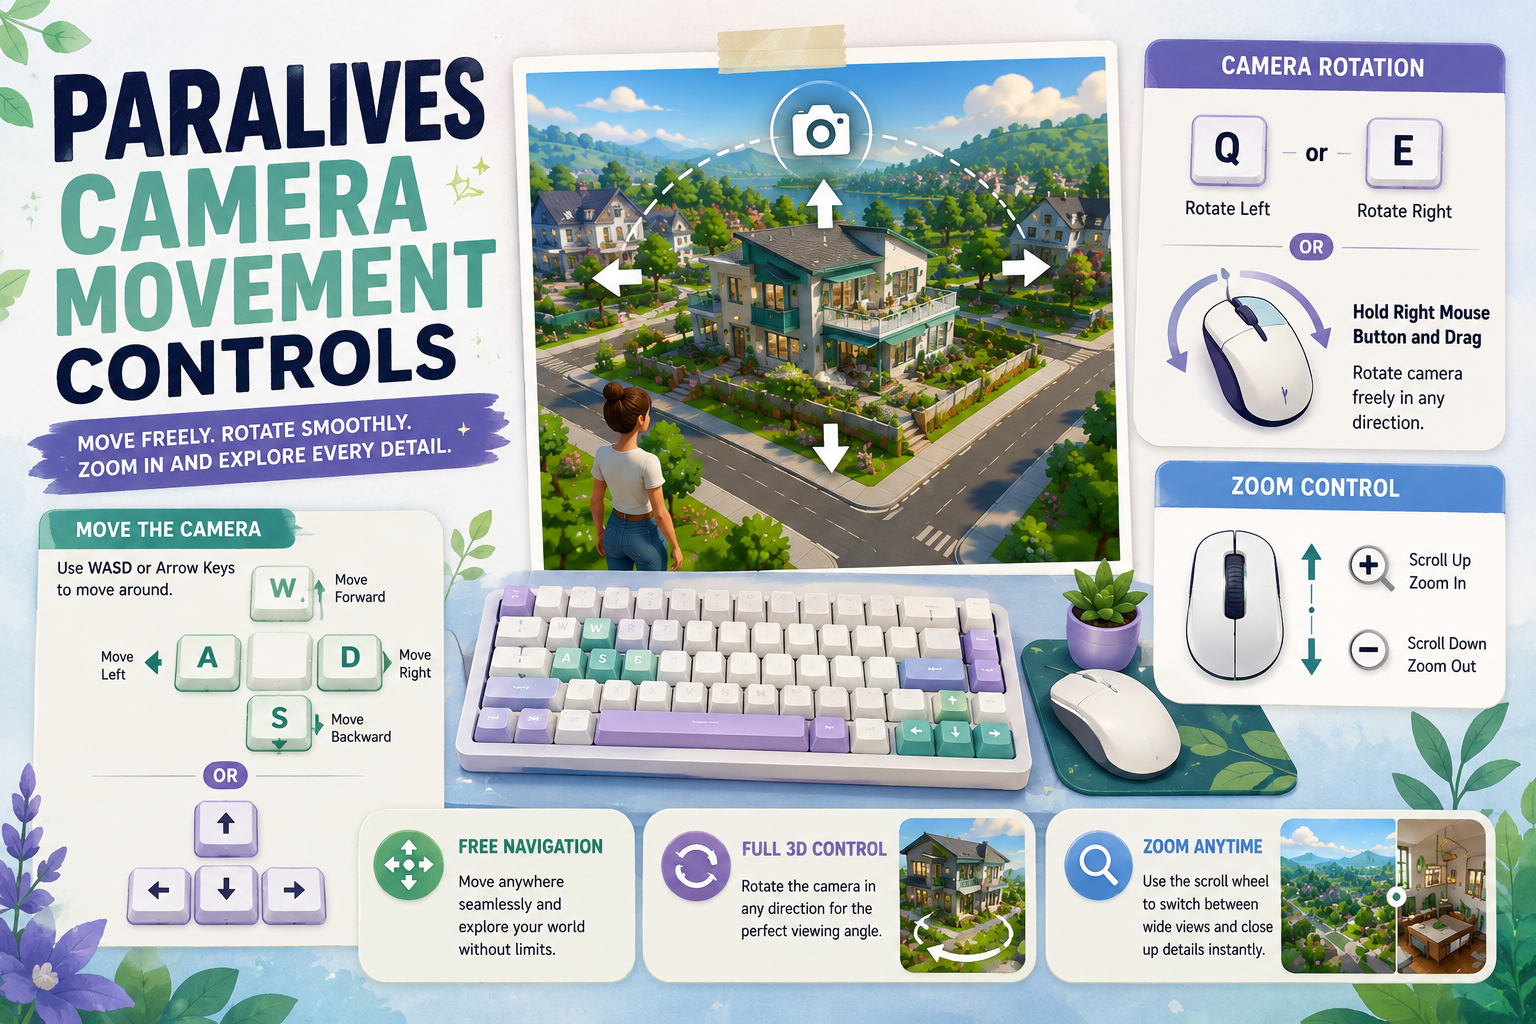
Camera movement is primarily controlled using WASD or arrow keys. To begin with, this allows players to freely explore the world without relying on menus or fixed views. In addition, rotation is handled through Q/E keys or right mouse drag, giving full 3D control. Meanwhile, zooming with the scroll wheel helps switch between wide and detailed views quickly.
WASD Camera Movement
Camera movement in Paralives is controlled using WASD keys. This is the core of Paralives WASD movement controls and allows players to move freely across the map.
W moves forward, S moves backward, A moves left, and D moves right. This system feels familiar to PC gamers because it follows the standard navigation design used in modern 3D games. It is especially useful when exploring large environments or switching between households in town.
Arrow Key Camera Movement
For players who prefer alternative layouts, the arrow keys can also be used for camera movement. This is useful for laptop users or players who do not like WASD positioning. The function remains identical, meaning there is no gameplay disadvantage. It is simply a comfort-based alternative.
Camera Rotation Controls
Camera rotation is handled by holding the right mouse button and dragging. You can also use Q and E keys for rotation, which is helpful for players without a mouse. Rotation is essential in Build Mode because it allows you to view structures from different angles before placing objects.
Camera Pivoting Explained
Camera pivoting means rotating the camera around a fixed point, usually a selected Parafolk or object.
This is useful when:
- Following characters during social interactions
- Inspecting rooms from different angles
- Managing multi-character scenes
It improves control precision and reduces camera drift during gameplay.
Zoom Controls
Zooming is handled using the scroll wheel or trackpad gestures. Zoom levels determine how close or far you are from the environment. Close zoom is ideal for Paramaker and facial editing, while wide zoom helps with town navigation and large building layouts.
Edge Scrolling Settings
Edge scrolling allows the camera to move automatically when your cursor reaches the screen edge. This is optional and can be toggled in the Paralives input settings menu. It is useful for players who prefer mouse-only navigation.
Inverted Camera Options
Some players prefer inverted camera movement. Paralives includes this option in settings so you can reverse camera direction based on personal preference. This is particularly helpful for players coming from flight simulators or older 3D games.
Best Camera Settings For Smooth Gameplay
A good setup includes:
- Medium camera sensitivity
- Enabled edge scrolling (optional)
- Smooth rotation settings
- Balanced zoom speed
These settings reduce motion fatigue and improve long-term comfort during extended gameplay sessions.
Paralives Character Movement And Gameplay Controls
Character control in Paralives is based on point-and-click movement. Players select a Parafolk and click a destination to move them automatically using pathfinding. Multiple characters can be selected using drag selection for group actions. This makes managing households and social interactions much more efficient.
Selecting A Para
Selecting a Parafolk is done using the left click. Once selected, you gain full control over their actions, emotions, and movement decisions. This is tied closely to the interaction system and household members’ management, especially in group gameplay.
Moving Around The World
To move Parafolk, you click on the ground and select a destination. They will automatically walk there using the pathfinding system. This is where Para Paths become visible if enabled in settings, showing exactly how characters will travel.
Centering The Camera On Characters
A simple shortcut allows you to instantly center the camera on selected Parafolk. This is useful during fast gameplay moments where you lose track of characters. It keeps gameplay focused and reduces unnecessary camera repositioning.
Managing Multiple Household Members
You can select multiple Parafolk using drag selection. This allows group control, which is essential for social interactions and activities. Group management is tightly connected to gameplay systems like Together Cards and relationship-building mechanics.
Quick Gameplay Actions
Quick actions help you manage gameplay without opening menus. These include:
- Instant pause
- Fast forward time
- Quick character switching
- Mode toggling
These controls ensure smooth simulation flow without interruptions.
Paralives Time Controls And Live Mode Shortcuts
Time controls are essential for managing daily life in the game. Spacebar pauses the simulation, allowing players to plan actions without pressure. Speed controls let you fast-forward routine tasks like sleeping or working. Quick shortcuts also allow switching between Live Mode, Build Mode, and Photo Mode instantly.
Pause Controls
Time control is one of the most important systems in Paralives. The pause function, usually triggered with the Space key, allows you to freeze the entire simulation. This is useful when you need to think, plan actions, or adjust multiple Parafolk at once. Pausing is especially helpful during busy household moments where needs, emotions, and social interactions overlap. Instead of reacting in real time, you can pause and take full control of decisions without pressure.
Speed Controls
Paralives includes multiple time speeds that let you fast forward daily life. These are often mapped to number keys and allow smooth switching between normal speed and fast simulation. Speed controls are essential for managing long actions like cooking, sleeping, or working jobs. They also help when you are waiting for events tied to short-term goals or daily routines.
Switching Between Gameplay Modes
Players can switch between Live Mode, Build Mode, and Photo Mode using quick keys or UI buttons. This is a core part of Paralives input settings menu design, making transitions smooth without needing to reload screens. This flexibility allows players to build, decorate, and simulate life in one continuous flow.
Town Map Shortcut
The Town Map shortcut opens the full world view instantly. From here, you can travel between lots, inspect neighborhoods like Melino, and manage household movement across the map. It is especially useful when managing multiple households or exploring empty lots for building projects.
Useful Everyday Gameplay Hotkeys
Some hotkeys become part of your daily gameplay rhythm:
- Pause for planning
- Speed up routine actions
- Map for navigation
- Mode switching for building and editing
These controls reduce UI dependency and make gameplay smoother overall.
Paralives Build Mode Keyboard Shortcuts
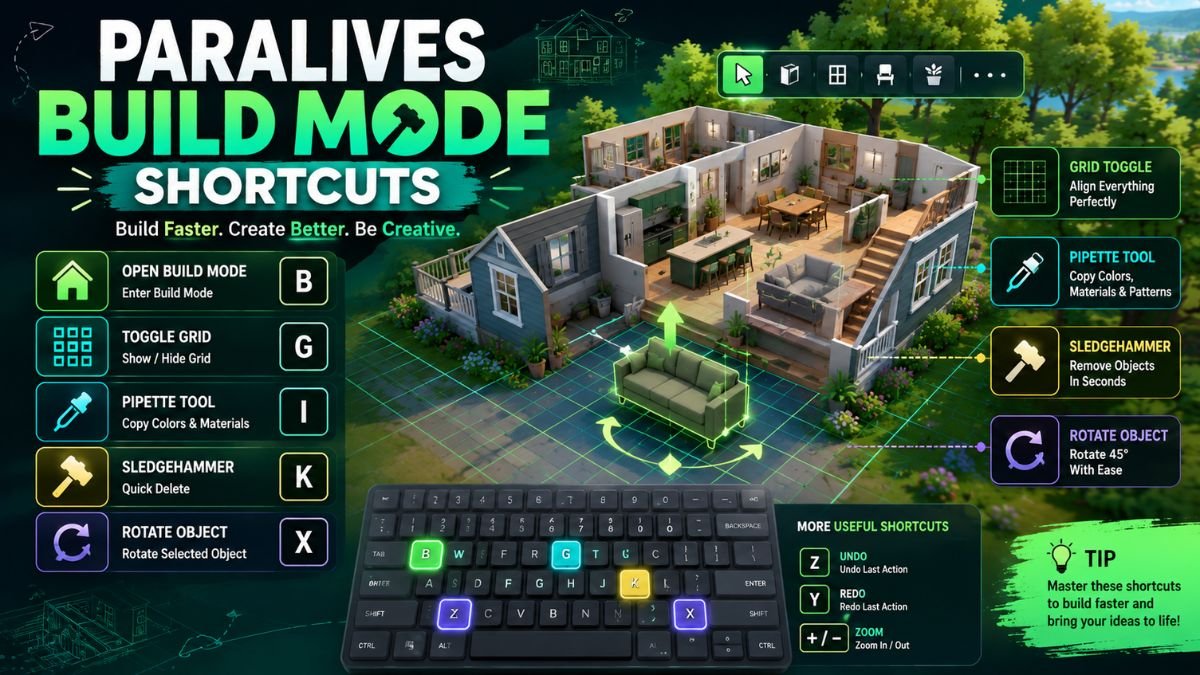
Build Mode uses specialized shortcuts to speed up construction and editing. Keys like B open Build Mode, while tools like pipette and sledgehammer improve workflow. Grid toggles and rotation shortcuts help with precise object placement. These tools make building faster and more creative.
Opening Build Mode
Build Mode is the creative core of Paralives. You enter it using a dedicated key or UI button. Once inside, the entire interface shifts to construction tools. This mode is where Paralives hotkeys for building become essential for speed and precision.
Searching The Build Catalog
The build catalog allows you to search for objects quickly instead of scrolling manually. This is done using a search shortcut that opens a quick search bar. It saves time and improves workflow when working with large furniture libraries.
Using The Pipette Tool
The pipette tool lets you copy objects directly from your build. Instead of searching again, you simply pick an item already placed and reuse it. This is one of the most powerful tools for efficient building.
Using The Sledgehammer Tool
The sledgehammer tool is used to delete objects quickly. Instead of selecting and confirming, you can remove items instantly. This is especially useful when redesigning rooms or correcting placement mistakes.
Grid Toggle Controls
Grid placement helps align objects perfectly. You can toggle grid visibility to switch between precise and free placement. This feature is critical for structured building layouts and clean interior design.
Object Rotation Shortcuts
Rotation controls allow objects to be turned in fixed or free angles. You can rotate furniture using keyboard shortcuts for faster placement. This is essential for decorative accuracy and room symmetry.
Vertical Object Placement Controls
One of Paralives’ advanced systems is vertical placement. You can move objects up and down freely, allowing for floating decorations or layered designs. This feature makes the object manipulation system much more flexible than traditional life simulation games.
Advanced Placement Widget Controls
The Advanced Placement widget provides precise control over object positioning. It allows fine adjustments in all directions for detailed customization. This is especially useful for creators who enjoy complex builds.
Disable Snap Controls
Snap controls help align objects automatically, but they can sometimes limit creativity. Disabling snap allows free placement without restrictions. This is often used by advanced builders who prefer manual control.
Build Mode Productivity Tips
To build faster:
- Use the pipette tool often
- Toggle grid depending on task
- Combine rotation shortcuts with snapping
- Use vertical placement for creative layouts
These habits significantly improve workflow efficiency.
Paralives Paramaker Controls Layout
Paramaker focuses on detailed character customization with smooth camera and mouse control. Players zoom in and rotate characters to adjust facial and body features. Sliders and drag tools are used for precise editing. This system allows deep customization while keeping controls simple and intuitive.
Navigating Paramaker
Paramaker is the character creation system in Paralives. It allows full customization of Parafolk’s appearance, body, and style. Navigation inside Paramaker relies heavily on mouse controls and camera rotation for detailed inspection.
Camera Controls In Paramaker
Camera movement in Paramaker is slower and more precise. Zooming in allows detailed facial editing, while rotation helps inspect character proportions. This is where the cinematic camera control system becomes important for precision editing.
Character Editing Controls
Editing controls allow you to adjust body shape, facial structure, and proportions using sliders and drag tools. This system is designed to be intuitive while still offering deep customization.
Facial Customization Controls
Facial editing includes eyes, nose, mouth, and expression control. You can zoom in closely to adjust fine details. This is one of the most detailed systems in Paralives and requires precise mouse movement.
Clothing And Appearance Navigation
Clothing selection is handled through menus with quick preview systems. You can rotate characters to see outfits from every angle. This helps in creating consistent visual styles for storytelling.
Paramaker Shortcuts And Efficiency Tips
To work faster in Paramaker:
- Zoom in for facial detail
- Rotate frequently for full inspection
- Use presets for faster customization
- Save frequently to avoid losing progress
Paralives Photo Mode Controls
Photo Mode offers free camera movement for cinematic screenshots. Players can zoom, rotate, and adjust lighting without gameplay restrictions. Depth of field and focus settings help create professional-looking visuals. It is designed for storytelling and creative composition.
Opening Photo Mode
Photo Mode is activated using a shortcut key or UI button. It freezes gameplay and opens a cinematic control system. This mode is widely used for screenshots and storytelling content.
Camera Controls In Photo Mode
The camera in Photo Mode is fully free. You can move, rotate, and zoom without gameplay restrictions. This allows full creative control over composition.
Animation Controls
Parafolk can be posed using animation tools. These controls allow you to select expressions and body movements. This is ideal for storytelling and cinematic scenes.
Depth Of Field Settings
Depth of field controls focus blur strength. You can highlight characters while blurring backgrounds for a cinematic effect. This is a key feature for high-quality screenshots.
Focus And Aperture Controls
Focus distance adjusts what part of the scene is sharp. Aperture controls determine how much light enters the virtual camera. These settings mimic real photography tools.
Filters And Visual Effects
Paralives includes filters like:
- Color adjustments
- Artistic effects
- Mood filters
- Cinematic overlays
These help create unique visual styles.
Taking Better Screenshots
For best results:
- Use close zoom for emotion shots
- Adjust the depth of the field for focus
- Use lighting changes at different times of day
- Combine poses with environment design
How To Remap Controls In Paralives?
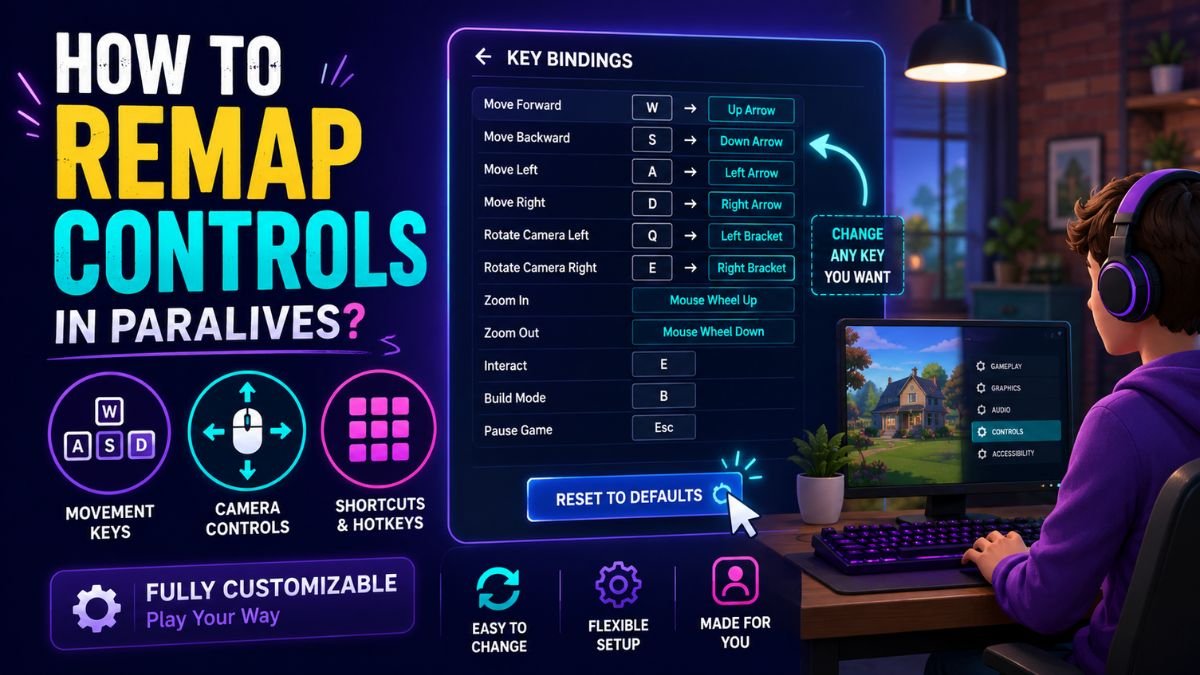
Controls can be fully remapped through the Key Bindings menu in settings. Players can change movement keys, camera controls, and shortcuts based on preference. If needed, default settings can be restored instantly. This makes the system flexible for different playstyles and accessibility needs.
Accessing The Key Bindings Menu
The how to remap controls in the Paralives system is built directly into the settings menu. You do not need external tools or mods. Inside the Key Bindings menu, every major action is listed with its current assigned key. You can access it from the main settings panel, where gameplay and accessibility options are grouped.
This is part of the broader Paralives input settings menu, designed to give players full control over how they interact with the game. For players switching from other life simulation games, this is where you can immediately reshape the control scheme to match your comfort level.
Changing Keyboard Shortcuts
To change a shortcut, simply click on the action and press the new key you want to assign. The system automatically replaces the old binding.
This is especially useful for:
- Players using laptops without full keyboards
- Users who prefer ESDF or custom layouts
- Accessibility setups requiring single-hand play
The flexibility ensures that Paralives default keybindings PC are not locked permanently and can evolve with your playstyle.
Restoring Default Controls
If something goes wrong, you can reset everything back to default settings with a single option inside the menu.
This is helpful when:
- You forget original bindings
- Keys overlap or conflict
- You want a clean setup again
Resetting ensures stability without reinstalling the game.
Creating A Personalized Control Setup
A good custom setup improves speed and comfort. Many experienced players build layouts based on:
- Faster camera access
- Easier build mode shortcuts
- Reduced finger strain
This is where Paralives keyboard shortcuts list optimization becomes important for long play sessions.
Recommended Custom Keybinds
A simple example setup:
- Camera movement on WASD
- Build tools on nearby keys
- Photo Mode on a single accessible key
- Map on a quick toggle
This reduces hand movement and improves reaction time.
Paralives Input Settings Menu Explained
The Paralives Input Settings Menu lets players customize controls, including keybinds, camera movement, and sensitivity settings. It also includes options like edge scrolling, UI scaling, and camera adjustments. Overall, it helps players create a comfortable and personalized control setup for smoother and more precise gameplay.
Camera Sensitivity Settings
Camera sensitivity controls how fast your view moves when using mouse or keyboard input. Higher sensitivity allows faster movement, while lower settings provide more precision. This directly affects Paralives’ camera movement controls, especially during Build Mode.
Zoom Sensitivity Settings
Zoom sensitivity adjusts how quickly the scroll wheel zooms in and out. If it feels too fast or too slow, you can fine-tune it here.
This is important for:
- Paramaker facial editing
- Build Mode precision
- Cinematic screenshots
Rotation Sensitivity Settings
Rotation sensitivity affects how quickly the camera rotates when using mouse drag or Q and E keys. A balanced setting helps avoid motion discomfort during long sessions.
Edge Scrolling Settings
Edge scrolling allows automatic camera movement when the cursor reaches the screen border. Many players prefer it for smooth navigation without constant key presses. It is fully optional and can be disabled anytime.
Accessibility Control Options
Paralives includes accessibility tools such as:
- Interface scaling
- Tooltip delay adjustment
- Camera shake reduction
- Color filters for visual clarity
These options ensure the game is comfortable for a wide range of players.
Interface Scaling Options
Interface scaling adjusts UI size. Larger UI is easier for readability, while smaller UI gives more screen space for gameplay. This is especially useful on high-resolution monitors.
Paralives Controller Support And Keybindings Layout
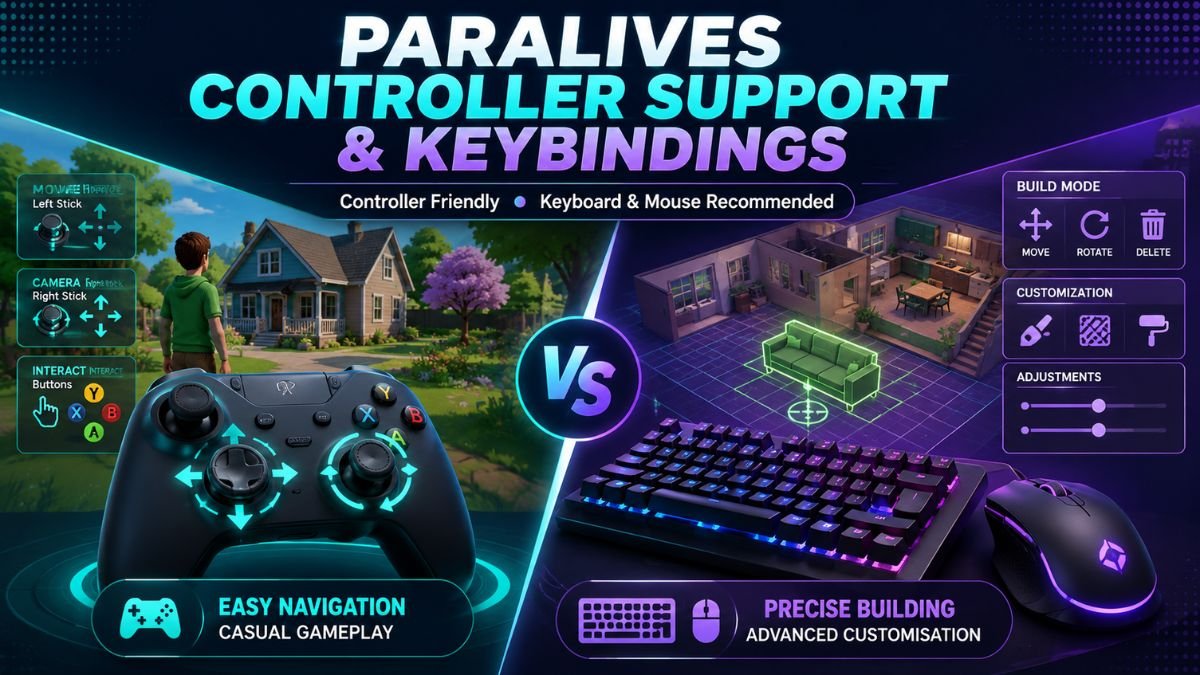
Controller support exists but is limited compared to keyboard and mouse. For instance, analog sticks handle movement and the camera, while buttons manage interaction. However, precision tasks like building and customization are much easier with a keyboard and mouse. Therefore, controllers are better suited for casual gameplay.
Does Paralives Support Controllers?
Paralives is primarily designed for keyboard and mouse, but controller support is being developed and may evolve. The system is expected to support basic navigation and selection functions. However, for precision tasks like Build Mode and Paramaker, keyboard and mouse remain the preferred method.
Xbox Controller Layout
On Xbox controllers, movement is typically handled using analog sticks, while buttons manage selection and camera control.
This setup is still less precise compared to PC controls, especially for object placement.
PlayStation Controller Layout
PlayStation layout follows similar logic:
- Left stick for movement
- Right stick for the camera
- Buttons for interaction
It is functional; however, it is not optimized for detailed building workflows.
Controller Navigation Basics
Controllers are best suited for:
- Casual exploration
- Basic character movement
- Simple interactions
They are less ideal for advanced building or Paramaker editing.
Keyboard And Mouse Vs Controller Comparison
| Feature | Keyboard And Mouse | Controller |
| Camera Control | Precise | Moderate |
| Build Mode | Advanced | Limited |
| Paramaker | Highly precise | Basic |
| Navigation | Fast | Comfortable |
| Customization | Full | Partial |
Keyboard and mouse clearly offer more control depth.
Which Input Method Is Best?
For most players, keyboard and mouse are the best option because Paralives is built around precision systems like object placement, camera control, and character editing. On the other hand, controllers are better suited for relaxed gameplay, but not for detailed simulation control.
Recommended Controls Settings For New Players
New players should start with medium sensitivity and default keybindings. This helps build familiarity without overwhelming complexity. Enabling grid snapping in Build Mode and keeping camera settings stable improves control accuracy. Gradual customization is recommended as players gain experience.
Camera Configuration
- Medium sensitivity
- Edge scrolling enabled
- Smooth rotation settings
Build Mode Settings
- Grid enabled for structure.
- Snap enabled for alignment.
- Pipette tool on the easy access key
Best Accessibility Adjustments
- UI scaling adjusted to screen size
- Reduced camera shake
- Tooltip delay shortened
Performance And Comfort Recommendations
A stable setup improves gameplay flow:
-
- Avoid overly high sensitivity
- Keep controls consistent
- If you feel confused, in that case, use the reset option to restore the default settings.
Common Control Issues and Fixes
If controls stop responding, checking key conflicts in settings usually solves the issue. Camera or zoom problems can often be fixed by resetting sensitivity. For input lag or glitches, restarting the game or re-enabling device input typically resolves the problem. In most cases, keeping settings stable prevents most control-related issues.
Keybinds Not Working
Check if another action is conflicting with the same key inside the settings menu. If necessary, reassign the keybind to resolve the conflict.
Camera Movement Problems
Reset camera settings or lower sensitivity.
Activity if movement feels unstable. Alternatively, restart the game or reconfigure the input settings to restore stable movement.
Zoom Controls Not Responding
Ensure scroll wheel or trackpad input is enabled in system settings.
Zoom Controls Not Responding
Reconnect the controller or restart the game to refresh input detection.
Resetting Controls To Default
Use the reset option inside the Key Bindings menu to restore the original layout instantly.
Paralives Controls Cheat Sheet
| CATEGORY | CONTROLS |
| Camera
Movement |
WASD / Arrow Keys |
| Rotation | Q / E / Right Mouse Drag |
| Zoom | Mouse Wheel |
| Pause | Space |
| Build Mode | B |
| Map | M |
| Photo Mode | P |
| Undo / Redo | Ctrl Z / Ctrl Y |
Frequently Asked Questions
What Are The Default Controls In Paralives?
The default controls in Paralives use WASD or arrow keys for camera movement, the mouse wheel for zoom, and Q and E or right mouse drag for rotation. These Paralives default keybindings PC are designed to be simple and easy for beginners to learn quickly without needing customization.
Can You Change Keybindings In Paralives?
Yes, all controls in Paralives can be fully remapped through the Key Bindings menu in settings. You can change the camera, Build Mode, and interaction keys to suit your playstyle. The how to Remap Controls in Paralives feature makes the game flexible for all types of players.
Does Paralives Support Controller Gameplay?
Paralives supports controllers in a limited way, mainly for basic movement and camera control. However, advanced tasks such as building and Paramaker editing work best with a keyboard and mouse. Therefore, the Paralives controller keybindings layout is better suited for casual gameplay.
How Do You Move Objects Up And Down In Paralives?
Objects can be rotated using the Q and E keys or mouse-based rotation, depending on your settings. Additionally, it provides greater flexibility when placing furniture or designing rooms. The Paralives build mode keyboard shortcuts help speed up building and improve placement accuracy.
How Do You Move Objects Up And Down In Paralives?
Camera controls include WASD or arrow keys for movement, mouse drag for rotation, and the scroll wheel for zoom. These controls are part of the Paralives camera movement controls system and allow smooth navigation in all gameplay modes.
How Do You Move Objects Up And Down In Paralives?
You can find the input settings inside the main settings menu under controls or key bindings. From there, you can adjust all gameplay inputs like camera sensitivity and shortcuts. The Paralives input settings menu helps customize your entire control experience.
Where Can I Find The Paralives Input Settings Menu?
Beginners should stick to default controls with WASD movement and medium sensitivity for smooth learning. Avoid changing too many keybinds early on to prevent confusion. The Paralives full keyboard map reference becomes more useful once you understand the basics.
Final Takeaway
Paralives PC controls are built to deliver precision and creative freedom once the basics are mastered. At first, understanding core actions like camera movement, mouse interaction, and keyboard shortcuts makes gameplay significantly smoother and easier to manage. Later on, Build Mode, Paramaker, and Photo Mode introduce deeper control for building, customization, and storytelling.
Because every control is fully customizable, fine-tuning keybinds and sensitivity to match personal comfort can greatly enhance performance and reduce confusion. As a result, gameplay becomes more fluid and intuitive. Moreover, these adjustments improve navigation and building efficiency, creating a more seamless overall experience.
Ultimately, once you master and personalize the controls, Paralives becomes a highly creative and enjoyable life simulation experience.