
Paralives is one of the most talked-about life simulation games in recent memory, and for good reason. At the center of all the excitement is the Paramaker tool, a character creation system that gives players more creative control than anything seen in the genre before. Whether you want to build a realistic version of yourself, design an entire fictional family, or craft a wild fantasy character, Paramaker makes it possible. This guide walks you through everything, from launching the character creation screen for the first time to mastering advanced morphing techniques, clothing customization, preset templates, and tips that even experienced players overlook.
What Is The Paralives Paramaker Tool?
Understanding Paramaker In Paralives
Paramaker is the built-in character editor in Paralives, the indie life simulation game developed by Alex Massé and the Paralives Studio team. It serves as the gateway to every character you play in the game, called Paras. Before your Para ever steps into a house, walks through a neighborhood, or builds a career, you design them from the ground up inside Paramaker. The tool is accessible from the main menu when starting a new game or household, and it stays available throughout your save so you can return and adjust characters whenever you want.
What makes Paramaker stand out from similar tools is the sheer depth of control it offers without making the experience feel overwhelming. Even a first-time player can jump in and produce a decent-looking character within minutes. At the same time, someone willing to spend an hour fine-tuning every detail will find the system rewards that patience with genuinely impressive results. The customization interface is designed to be approachable but deep, which is exactly what a life simulation game needs.
The development team has been open about their goals with Paramaker since early access previews began circulating. They wanted to build a system that felt like sculpting, not just sliding values left and right. That philosophy shapes everything about how the tool works, from the way you reshape a nose by clicking and dragging to how body proportions respond when you adjust height or shoulder width.
How Paramaker Differs From Traditional Character Creators?
Most character creators in games give you a set of sliders tied to specific values. Move the slider to the left, and the nose gets smaller. Move it to the right, and it gets bigger. That works, but it limits creativity because you are always working within the boundaries someone else set. Paramaker takes a different approach with its drag-to-shape system, which lets you click directly on a part of the face or body and pull it in the direction you want it to go.
This makes the experience feel much more like using a sculpting program than filling out a character sheet. If you want to push the cheekbones up and slightly forward, you click on the cheek area and drag in that direction. The mesh responds in real time, giving you instant visual feedback. Traditional sliders make this kind of nuanced adjustment nearly impossible without spending minutes hunting for the right control.
The other major difference is how Paramaker handles body proportions. Rather than treating height, weight, and shape as separate, unrelated values, the system links them together in a way that produces realistic results. Adjusting height, for example, also affects limb length in proportion, so your Para doesn’t end up looking like a bobblehead or a giant with tiny arms.
Key Features That Make Paramaker Unique
Paramaker brings several standout features to the table that separate it from competitors in the life simulation space. The direct drag-and-pull customization is the most talked-about, but the preset template library, layered appearance editor, and real-time camera controls all contribute to making the tool feel complete.
One underrated feature is the ability to apply asymmetry. Real human faces are not perfectly symmetrical, and Paramaker lets you introduce subtle differences between the left and right sides of a face. This one option alone can take a character from looking like a video game avatar to looking surprisingly realistic. Most character editors in this genre still force symmetry by default and make asymmetry difficult or impossible.
Another key feature is how clothing customization connects to body shape. When you adjust your Para’s body, clothing pieces update to fit properly rather than clipping through or distorting. This detail matters more than it sounds because it keeps the character looking polished, no matter what body type you design.
Launching The Paramaker Screen
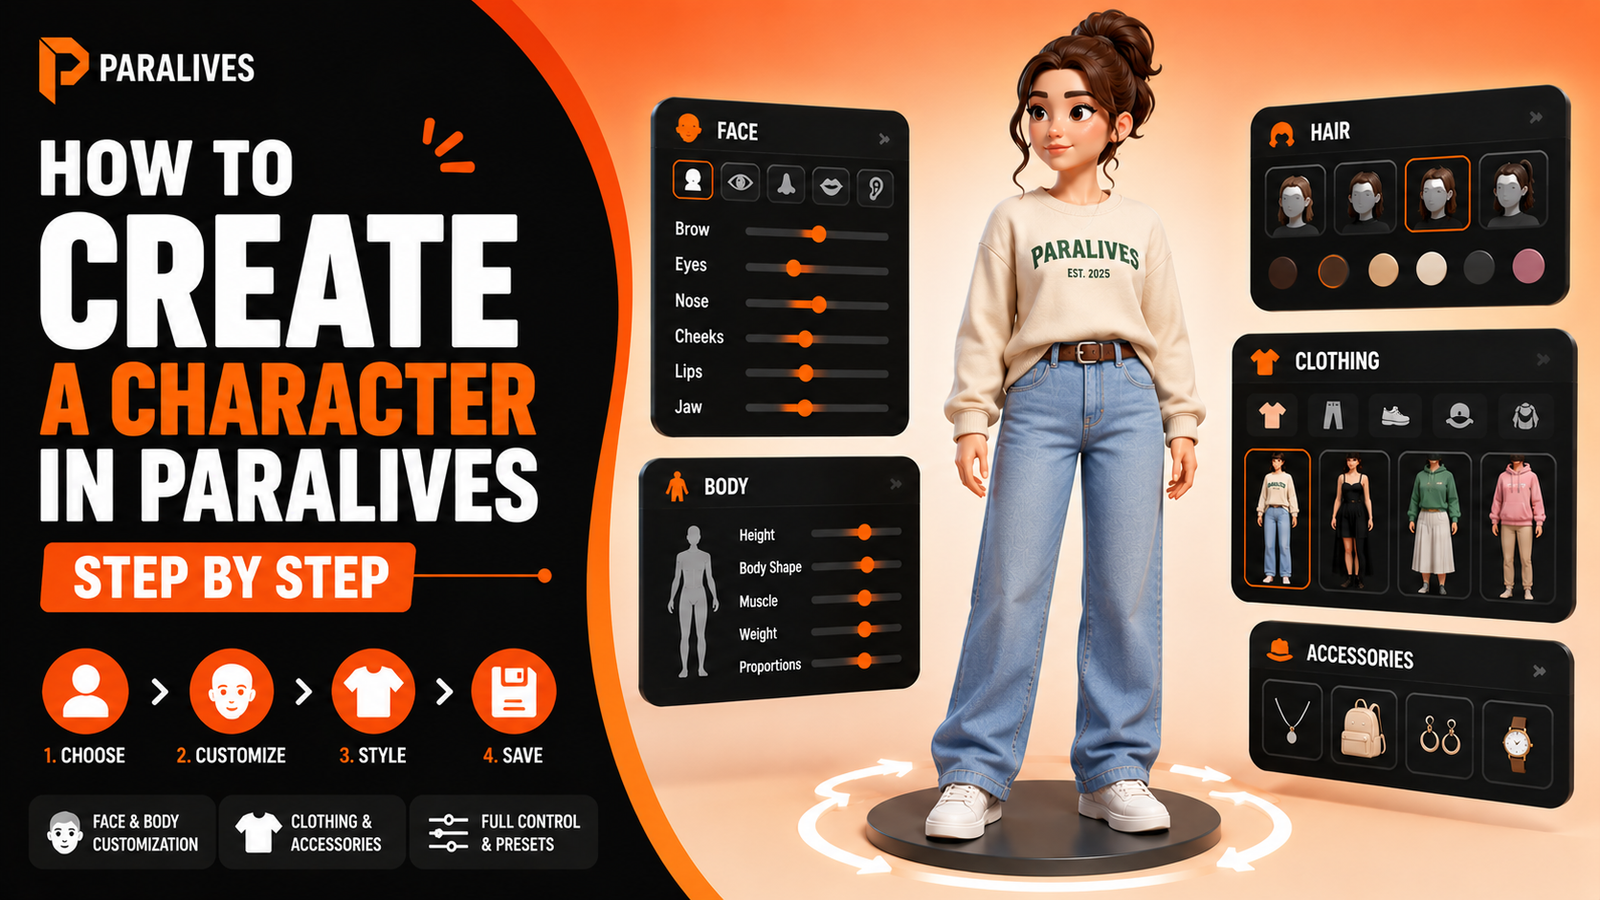
How To Create A Character In Paralives Step By Step?
Launching The Character Creation Screen
When you start a new game or create a new household in Paralives, the game drops you directly into the Paramaker interface. The character creation screen opens with a default Para standing in the center of the editing space, surrounded by the various customization panels on the sides. The camera is positioned at a comfortable viewing distance, and you can rotate around the character freely using the mouse or trackpad.
Before you touch any sliders or morphing tools, take a moment to look at the layout. The left panel typically contains face and body editing options. The right panel handles clothing, hair, and accessories. At the top of the screen, you will find category tabs that let you jump between different sections of customization. Getting familiar with where things live before you start editing saves a lot of time and frustration.
Choosing A Starting Template
Paramaker includes a library of starting preset templates that give you a base to work from. These are not finished characters but rather rough starting points with different body types, face structures, and basic appearances. Choosing a template that is already close to what you have in mind is the fastest way to get a good result, because you spend less time on broad strokes and more time on fine details.
Templates are organized into categories. Some lean toward realistic proportions, others toward more stylized looks. If you are building a family, it can help to pick templates from the same general category so the characters look like they could actually be related.
Creating Your First Para
With a template selected, start with the face. Most experienced players recommend working top to bottom, starting with the overall head shape, then moving to the eyes, nose, mouth, and finally the jawline and ears. This order works well because changes to the head shape affect how everything else sits on the face.
Use the drag-and-pull system by hovering over the part of the face you want to adjust, clicking, and pulling in the direction you want it to move. Small adjustments usually look better than dramatic ones on your first try. Once the face is in a place you are happy with, move to the body and adjust height, proportions, and muscle definition. Then finish with hair, skin, and clothing.
Saving And Editing Characters Later
Paramaker auto-saves your character as you work, but you should also manually save named versions if you are experimenting with different looks. This is especially useful when you are not sure which direction you want to take a character. Save version one, try something different, save version two, and then compare before committing.
You can return to Paramaker at any point during your game to edit an existing Para. Changes to appearance take effect immediately, so you are never locked into a design you made at the start.
Common Beginner Mistakes To Avoid
The most common mistake new players make is pushing sliders or morphing tools too far in one direction. Extreme adjustments create characters that look distorted rather than distinctive. A better approach is to make a moderate change, step back from the screen, look at the character as a whole, and then decide if you want to push further.
Another frequent mistake is ignoring body proportions while focusing entirely on the face. A beautifully designed face can look strange sitting on a body with mismatched proportions. Always check the full character view regularly while editing.
Understanding The Paramaker Interface
Main Customization Panels
The Paramaker interface is divided into panels that group related customization options together. The face editing panel contains controls for every individual feature from the eyes and nose down to the chin and ears. Below that, the body panel handles overall shape, height, weight distribution, and muscle tone. A separate panel covers all appearance options like skin tone, eye color, makeup, and distinctive features like freckles or beauty marks.
Each panel uses a combination of direct drag interaction on the character model and some traditional sliders for settings that work better as precise values. Skin tone, for example, uses a color picker with sliders for hue and saturation, which gives you much finer control than a preset grid of options.
Navigation Controls And Camera Tools
Moving the camera in Paramaker is straightforward. Left-clicking and dragging rotates the view around your Para. Right-clicking and dragging pans the camera horizontally or vertically. Scrolling zooms in and out. These controls work in all customization sections, so you can get a close-up view of the face while editing facial features or pull back to see the full body when adjusting proportions.
There are also quick-zoom buttons that snap the camera to specific views: full body, face close-up, profile, and back view. Using these regularly while editing helps you catch issues you might miss from a single angle. A jawline that looks perfect from the front might appear too sharp or too flat from the side.
Editing Different Character Sections
Clicking on a specific part of the character model in the viewport automatically switches the active editing panel to the relevant controls. Clicking on the nose, for example, jumps you directly to nose customization without needing to navigate through menus. This context-sensitive switching speeds up the workflow considerably once you get used to it.
Using Drag-And-Pull Customization Features
The drag-and-pull system is Paramaker’s signature feature and the one that takes the most practice to use well. The key is understanding that the direction you drag determines which aspect of a feature changes. Dragging upward might raise a feature’s position, while dragging outward might increase its width. Diagonal drags combine both effects.
Face Sliders Guide
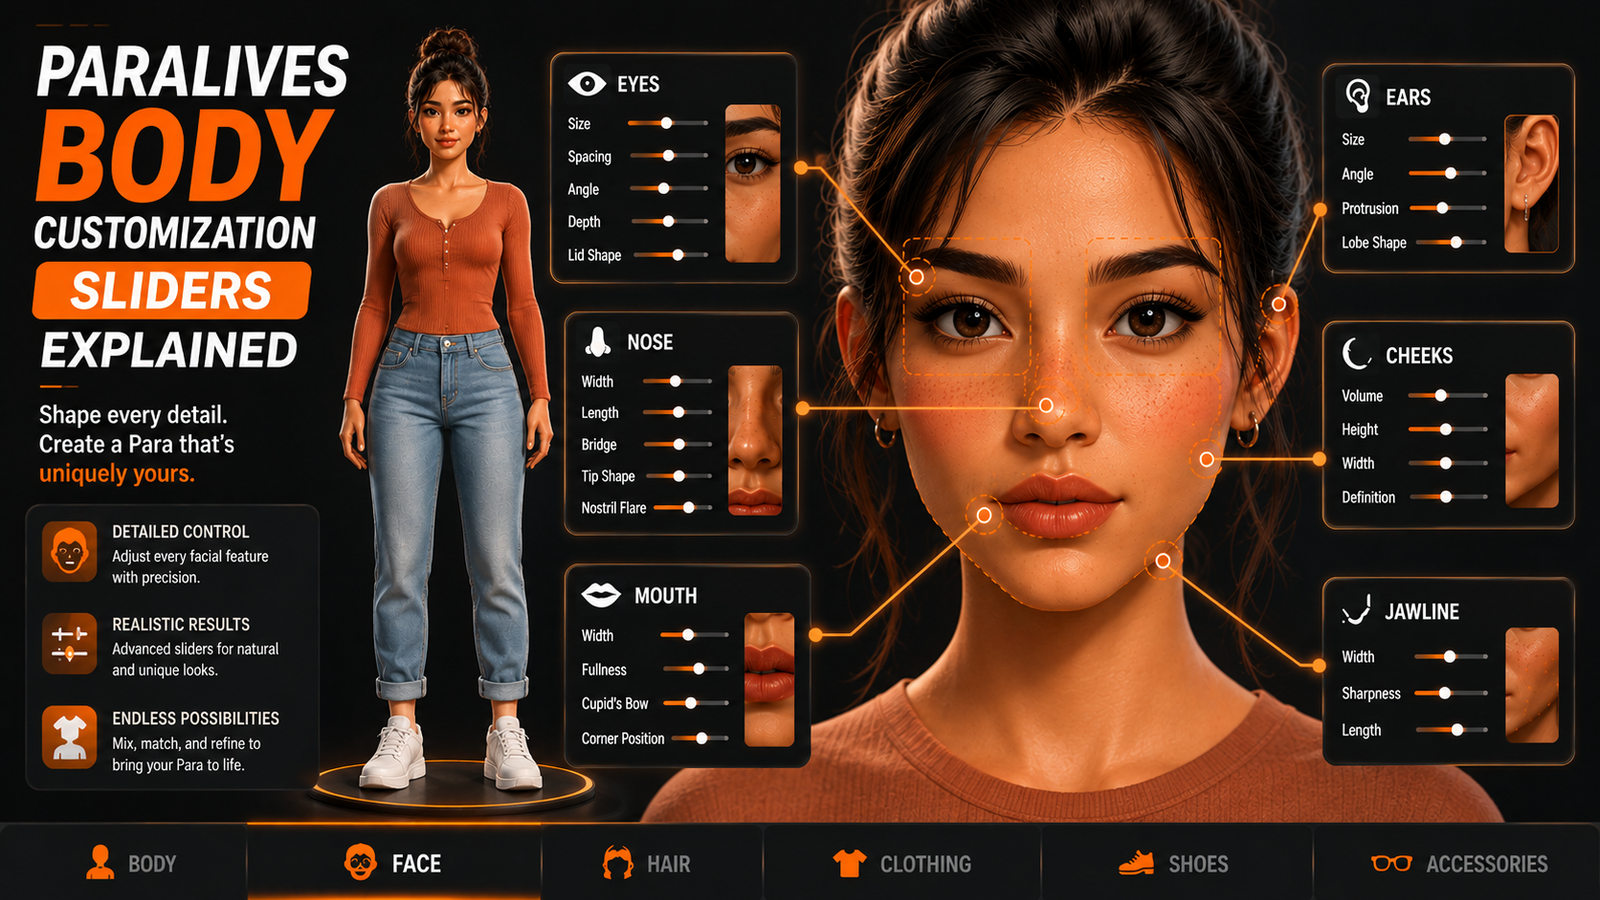
Paralives Body Customization Sliders Explained
Facial Structure Customization
Paramaker breaks the face down into individual features, each with its own set of adjustable properties. Here is a quick breakdown of what each area covers:
| Feature | What You Can Adjust |
| Eyes | Size, spacing, angle, depth, lid shape |
| Nose | Width, length, bridge height, tip shape, and nostril flare |
| Mouth | Width, lip fullness, cupid’s bow definition, and corner position |
| Jawline | Width, sharpness, length |
| Ears | Size, angle, protrusion, lobe shape |
| Cheeks | Volume, height, width, definition |
Eyes sit at the top of most people’s editing priority list because they carry the most personality. Paramaker lets you adjust not just the size and spacing but also the angle of the outer corners and the depth at which the eyes sit in the face.
Nose editing is where the drag-and-pull system really proves its value. Adjusting the bridge, tip, and nostrils as separate areas gives you control that slider-only systems simply cannot match.
Mouth customization covers lip shape, fullness, and corner position. Combined with the jaw adjustments, you can produce a wide range of mouth shapes from subtle and natural to more stylized designs.
Jawline changes have a big impact on overall face shape. A wider, sharper jaw reads as strong and angular. A softer, narrower jaw creates a rounder, gentler appearance.
Ears are often overlooked but can add a lot of character, especially for stylized designs. Larger or more prominent ears can make a character memorable in a way that perfectly symmetrical features alone cannot.
Cheeks affect how light falls on the face. Higher cheekbones catch light and create a more defined look. Lower, fuller cheeks produce a softer, rounder face shape.
Body Shape Customization
Body customization in Paramaker operates through a combination of direct morphing and some targeted controls for specific measurements.
Height adjustments affect the overall scale of the character while maintaining proportional limb length. Paras can range from quite short to quite tall, and the game handles the in-world scaling accordingly.
Weight and body proportions work together to define the overall silhouette. You can create lean, athletic, average, or larger body types, and the system handles the transitions between them smoothly without creating visual artifacts in the mesh.
Shoulder width is a standalone control that lets you fine-tune the upper body silhouette independently of the overall weight setting. This is useful for creating characters with specific builds, like a slender Para with broad shoulders.
Waist and hips can be adjusted relative to each other, allowing for a wide range of silhouettes from very straight to pronounced curves in either direction.
Muscle definition adds visible tone to the arms, legs, and torso without necessarily changing the overall size of the body. A heavy-set Para can have visible muscle definition, and a lean Para can look soft or toned depending on this setting.
Advanced Morphing System
Beyond the individual feature controls, Paramaker includes a layered morphing system that lets you blend between multiple body shapes. Think of it like mixing paint: you can take 60 percent of one body template and blend it with 40 percent of another to create something between them. This feature is particularly useful when you have a clear vision of a character but cannot quite get there through direct editing alone.
Creating Realistic Character Proportions
Realistic proportions come down to one principle: features should relate to each other logically. Eyes that are very wide apart need a broader nose and wider mouth to maintain balance. A very narrow face needs smaller, more compact features. When one feature is significantly out of proportion with the others, the whole face reads as wrong, even if you cannot immediately identify why.
Creating Unique Faces With Paramaker
Building Realistic Characters
Realistic characters start with reference. Whether you are trying to recreate a real person or just want a generally believable look, having a photo or image to work from is enormously helpful. Load it up on a second screen or your phone and compare regularly as you work.
Realistic skin tone is more complex than just picking a color. Real skin has variation, with slightly different tones on the cheeks, nose, and around the eyes. Paramaker’s skin customization tools allow for this kind of layered complexity.
Designing Stylized Characters
Stylized characters give you freedom to break the rules of realistic proportions intentionally. Larger eyes, a smaller nose, and softer features can create a character that reads as animated or manga-influenced. The key to stylized designs is consistency. If the eyes are exaggerated, the rest of the face should match that energy rather than mixing exaggerated and realistic elements randomly.
Using Facial Symmetry And Asymmetry
Perfect symmetry looks unnatural on a human face because no real face is perfectly symmetric. Paramaker lets you introduce subtle differences between left and right. A slightly higher eyebrow on one side, a mouth corner that sits a touch lower on the other side. These small imperfections make a character look more real and more interesting.
Tips For More Natural-Looking Paras
Zoom out frequently and look at the whole face rather than individual features in isolation. Natural-looking faces are about balance and the relationship between features, not about any single feature being perfect. Also, spend time on the skin. Skin tone and texture details like freckles or subtle variations in color do more for a realistic look than precise slider work on any individual feature.
Paralives Character Preset Templates
What are Preset Templates?
Preset templates in Paramaker are pre-built starting points that give you a complete or near-complete character appearance with one click. They cover a range of ages, body types, and general aesthetic directions. Using a preset does not lock you into anything; every aspect of it remains editable after selection.
How Presets Speed Up Character Creation?
Starting from scratch on a complex character takes time. Presets skip the foundational work and drop you into the detail phase immediately. If you need to create a large household of six or eight characters, starting from relevant presets for each one can cut your total creation time significantly.
Modifying Existing Presets
The best use of presets is as a foundation, not a finished product. Select a preset that is in the right ballpark for what you want, then use the direct editing tools to push it in the direction of your vision. This hybrid approach balances speed with personalization.
Creating Custom Presets For Future Use
After building a character you are proud of, save it as a custom preset before adding it to a household. This lets you reuse that design as a starting point for future characters, which is especially useful if you have a consistent visual style you like to work within.
Best Ways To Organize Saved Characters
Name your saved presets clearly and descriptively. A name like “Athletic Female Base Mid Age” tells you everything you need to know when scanning a library weeks after you created it. Vague names like “Character 4” become confusing fast.
Hair, Skin, And Appearance Customization
Hair Styles And Variations
Paramaker includes a wide library of hairstyles covering short, medium, and long lengths across straight, wavy, and curly textures. Styles are organized by length and type, making it easy to browse without scrolling through unrelated options.
Hair Color Options
Hair color goes beyond a simple color picker. You can set a base color, add highlights or lowlights in a contrasting shade, and adjust how roots grow out from the scalp. This level of detail allows for everything from a natural single-tone look to a fully styled two-tone or ombre effect.
Skin Tone Customization
Skin tones span the full human range with controls for hue, undertone warmth or coolness, and overall depth. Additional detail layers let you add features like freckles, sun spots, vitiligo patterns, and redness around the nose or cheeks.
Eye Colors And Details
Eye color customization includes the iris color, pupil size, and limbal ring darkness. The combination of these three controls produces a range of eye appearances from pale and washed out to deep and intense.
Makeup And Cosmetic Features
The makeup section covers eyeshadow, eyeliner, mascara, blush, and lip color independently. Each can be applied in different intensities, and colors pull from a full palette rather than a preset list.
Distinctive Appearance Features
Birthmarks, moles, beauty marks, and scars can be added and positioned anywhere on the face. These small details are often what make a character feel truly unique and personal.
Paralives Clothing Options Guide
Everyday Clothing Categories
Clothing in Paramaker is organized by category: tops, bottoms, full outfits, footwear, and accessories. Each category contains items designed for everyday casual wear, active wear, work settings, and leisure.
Seasonal Outfits
Paralives plans to support seasonal gameplay, and clothing reflects this with items specifically suited to warm weather, cold weather, and transitional seasons. Heavy coats, scarves, and boots sit alongside summer dresses, shorts, and sandals.
Formal And Casual Wear
Both ends of the formality spectrum are covered. Formal options include suits, blazers, dress shirts, and gowns. Casual options cover everything from basic tees and jeans to loungewear and athletic gear.
Accessories And Personal Style
Accessories include hats, glasses, earrings, necklaces, bracelets, bags, and watches. Each accessory works as a separate layer, so you can mix and match freely without items conflicting with each other.
Color And Pattern Customization
Most clothing items in Paramaker support color customization. You can change the primary color of an item, and many pieces also let you adjust secondary colors for details like stitching, buttons, or trim. Some items support pattern selection with options for stripes, checks, florals, and graphic prints.
Mixing And Matching Clothing Pieces
Because tops, bottoms, and accessories are independent layers, you can combine any piece with any other. There are no locked combinations, so your Para can wear exactly what you envision without being forced into preset outfit bundles.
Personality And Character Identity Creation
Building A Character Backstory
While Paramaker focuses on appearance, thinking about your Para’s backstory as you create them helps you make design choices that feel cohesive. A character you imagine as a retired athlete will naturally steer you toward a more toned build and practical clothing. A creative type might influence you toward a more eclectic mix of colors and accessories.
Choosing Traits And Preferences
Paralives includes a trait and preference system that connects to how Paras behave in the game world. Traits influence mood, social interactions, and career success. Choose traits that match the personality you have in mind rather than just picking what seems mechanically optimal, because a character that feels real is more fun to play.
Creating Different Character Archetypes
Some players enjoy building recognizable archetypes: the friendly neighbor, the ambitious career climber, the laid-back creative. Archetypes give you a shortcut to a character that feels purposeful right from the start, and Paramaker’s tools make translating those archetypes into a visual identity surprisingly straightforward.
Designing Families And Households
When building a family, add visual consistency cues that make the household feel believable. Similar eye shapes or nose structure between parent and child characters, shared skin tone ranges, or complementary style choices in clothing all contribute to a family that looks like it belongs together.
Advanced Paramaker Tips For Better Characters
Creating Realistic Families
Use the preset library to find a base for each family member, then manually adjust shared features like eye shape or jaw structure across the group. This is faster than building from scratch for each member and produces more consistent results.
Designing Diverse Characters
Paramaker’s skin tone, facial features, and hair texture tools support a wide range of ethnic backgrounds. Take time to adjust undertones, hair texture, and facial proportions together rather than just changing skin color alone. The combination of all these elements produces an accurate and respectful representation.
Using Reference Images Effectively
Keep a reference image open on a second screen or device while building a character. Glance at it regularly and compare specific features rather than trying to hold the whole image in your head. Focus on one feature at a time: first, the eye shape matches, then the nose, then the mouth.
Combining Presets With Manual Adjustments
The fastest path to a great character is almost always preset plus manual refinement. Pick the closest preset, make targeted adjustments to the features that matter most, and leave features you are happy with untouched. Trying to rebuild a preset from scratch usually produces worse results in more time.
Building Consistent Character Styles
If you play across multiple households or saves, maintaining a personal style guide for the kinds of characters you build keeps your game world feeling visually coherent. Even simple notes like “I prefer natural hair colors and earth-tone clothing” help you make faster decisions and avoid inconsistency.
Speeding Up The Creation Process
Learn the keyboard shortcuts for common actions like rotating the camera, switching panels, and undoing changes. Paramaker is much faster to use with shortcuts than with mouse-only navigation, especially when you are deep into a detailed editing session.
Best Character Creation Ideas To Try In Paralives
Realistic Modern Families
Build a three-generation household with grandparents, parents, and children. Use shared facial features across generations and age-appropriate clothing styles for each character. This kind of household creates a rich gameplay experience with a lot of natural character interactions.
Fantasy-Inspired Characters
Use extreme morphing options to create characters with exaggerated features that lean into a fantasy aesthetic. Pointed chins, large eyes, and unconventional hair colors can suggest elven or otherworldly characters without needing any custom assets.
Celebrity-Inspired Designs
Recreating real people in Paramaker is a popular creative challenge. Use reference photos and work through features systematically. Do not aim for photographic accuracy; aim for a character that is clearly inspired by the reference while still feeling like a game character.
Historical Character Concepts
Combine body type choices with historically appropriate clothing options to evoke specific eras. A formal suit with slicked-back hair reads as mid-century. Layered earth tones with natural hair create a more rustic, historical feel. Paralives’ clothing range supports a surprising amount of historical interpretation.
Story-Driven Household Builds
Design characters around a specific story premise. A household of college roommates with very different backgrounds and aesthetics. A family dealing with a specific challenge. Characters with relationships and histories built into their design choices. Story-driven households tend to produce some of the most memorable gameplay.
Common Character Creation Mistakes And How To Avoid Them
Overusing Extreme Sliders
Pushing any feature to its absolute maximum or minimum almost always looks worse than a strong but moderate adjustment. Extreme settings are there for creative freedom, not as a default approach. Use them intentionally.
Ignoring Character Proportions
Time spent on facial details is wasted if the body proportions look off. Always check the full character view at multiple stages of editing, not just at the end.
Poor Outfit Coordination
Random clothing combinations can undermine an otherwise great character design. Give your Para a consistent style direction: casual, formal, athletic, eclectic, or whatever fits their personality. Even eclectic characters benefit from a consistent color palette.
Creating Unrealistic Facial Features
Mixing realistic and heavily stylized features on the same face creates visual tension that reads as unfinished. Decide on your aesthetic direction early and stay consistent across all facial features.
Forgetting Long-Term Gameplay Considerations
Consider how your character will look during gameplay and not just in the creation screen. Clothing choices that look great in the editor might become annoying during certain gameplay activities. Keep practicality in mind alongside aesthetics.
Paramaker Features Players Are Most Excited About
Community Feedback And Expectations
The Paralives community has followed Paramaker’s development closely through dev blogs and early footage. The drag-to-shape system generated immediate excitement when it was first shown publicly because it represented a genuine innovation over what The Sims 4 offers, which is still the dominant life simulation game.
Players have consistently highlighted the asymmetry feature, the body proportion flexibility, and the hair customization depth as the features they are most excited to use in the full game.
Features That Differentiate Paralives From Life Simulation Competitors
Compared to the Sims franchise, Paralives offers direct mesh editing rather than preset-based morphing, full asymmetry support as a built-in feature, and hair texture and color tools that go significantly deeper than what mainstream life simulators currently provide.
Future Expansion Possibilities
The development team has indicated that Paramaker is designed to support future expansion through updates and community content. Modding support is expected, which means the library of clothing, hair options, and even customization tools will grow significantly after launch through community contributions.
Paralives Character Creation Tips For Beginners
Start With Presets
Do not start from scratch on your first character. Pick a preset that is roughly what you want and modify from there. You will produce better results faster and learn how the tools work in the process.
Focus On One Feature At A Time
Trying to adjust everything at once leads to confusion about what changed and what needs to change. Work through the face in a consistent order and give each feature proper attention before moving on.
Save Multiple Versions
Save a version of your character at different stages of editing. If you push something too far and want to go back, you will have a restore point rather than having to undo dozens of changes.
Experiment Without Fear
Nothing in Paramaker is permanent until you commit to adding a character to a household. Experiment freely. Try combinations that seem unusual or risky. Some of the most interesting character designs come from unexpected choices.
Learn Through Iteration
Your first character in Paramaker probably will not be your best. Each one you build teaches you something about how the tools work and what produces the results you are looking for. The more you use it, the faster and better you get.
Frequently Asked Questions (FAQ)
What Is The Paramaker Tool In Paralives?
Paramaker is the character creation and editing system in Paralives. It allows players to design their characters, called Paras, using a combination of drag-and-pull mesh editing, customization sliders, preset templates, and appearance tools covering skin, hair, eyes, and clothing.
How Do You Create A Character In Paralives?
To create a character in Paralives, launch the game and start a new household. The Paramaker interface opens automatically. Choose a starting preset template, then use the face and body editing tools to customize your Para’s appearance. When finished, add them to your household and begin playing.
Can You Adjust Body Proportions In Paralives?
Yes. Paramaker includes detailed body proportion controls covering height, weight distribution, shoulder width, waist, hips, and muscle definition. These can be adjusted independently or in combination to create a wide range of body types.
Are There Character Preset Templates In Paralives?
Yes. Paramaker includes a library of preset templates that serve as starting points for character creation. These cover a range of body types, face structures, and aesthetic directions. Every preset is fully editable after selection.
How Detailed Is The Clothing Customization System?
Clothing customization in Paralives covers tops, bottoms, full outfits, footwear, and accessories as independent layers. Most items support color customization, and many include pattern options. Pieces can be mixed and matched freely without any locked combinations.
Can You Create Realistic People Using Paramaker?
Yes. Paramaker’s facial morphing tools, skin tone controls, hair texture options, and asymmetry support make it possible to create characters that look genuinely realistic. Using reference images while editing helps significantly.
What Are The Best Advanced Paramaker Tips For Beginners?
The most effective advanced tip is combining presets with targeted manual adjustments rather than building from scratch. Also, use the asymmetry controls for more natural faces, work with reference images, and save multiple versions of your character at different stages of editing.
Can You Edit A Character After Starting A Game In Paralives?
Yes. Paramaker remains accessible throughout your save, allowing you to return and edit any character in your household at any time. Changes apply immediately when you exit the editor.
Final Takeaways
Paramaker is genuinely one of the most impressive character creation systems in the life simulation genre. The drag-to-shape editing, the depth of body proportion controls, the hair customization tools, and the layered appearance system all come together to give players creative freedom that feels meaningful rather than overwhelming. Whether you are a newcomer to life simulation games or a veteran player looking for something that goes deeper than what you have used before, Paramaker delivers.
The key takeaways from this Paralives character creation guide are simple: start with presets, use the drag-and-pull system to make targeted adjustments, check proportions regularly, and do not be afraid to save and experiment. The best Paras are the ones built with intention and a willingness to iterate until the character feels right.
Paralives is still in development, and Paramaker will likely continue to evolve. Getting familiar with the tools now puts you ahead of the curve for when the full game launches.