
Importing characters in Paralives is one of the most exciting parts of the game’s community experience. Whether you downloaded a beautifully designed Para from a content creator, received a character file from a friend, or want to load a saved character into a new save, knowing how to import characters in Paralives correctly saves you from hours of frustration. This guide walks you through every step of the process, from downloading a character file safely to finding the right folder, loading the Para in Paramaker, and fixing common import errors. You will also learn how to share your own Paras with others, manage large character collections, and keep your library organized for faster load times.
Understanding Character Importing In Paralives
Before you touch a single file, it helps to understand what character importing actually means in Paralives and why it works the way it does. Paralives uses a specific file-based system for storing and sharing player-created characters, which makes the process more manual than clicking a single in-game button, but also more flexible and community-friendly.
What Is A Para Character File?
A Para character file is a saved digital character template that stores every customization choice made in Paramaker, which is Paralives’ character creation system. This includes body proportions, facial features, hair, clothing, personality traits, and any other appearance settings the creator applied. When someone exports their Para, the game packages all of that data into a single file that another player can drop into their game and load directly.
Why Players Import Custom Characters
Community character sharing has been a staple of life simulation games for years. In The Sims 4, downloading custom Sims from the Gallery is one of the most popular features. Paralives is building toward a similar ecosystem where player-created content, including user-generated characters, becomes a core part of the experience. Players import characters to populate their saves with diverse, creative Paras they did not have to build from scratch, to use characters made by their favorite creators, or simply to share avatars with friends playing the same save.
Supported Character Sharing Features In Paralives
Paralives is designed with character sharing in mind. Paramaker, the game’s avatar customization workflow tool, supports both exporting and importing downloadable character packages. While the full online gallery feature may expand post-launch, the file-based import system works cleanly and reliably as the primary method of character transfer for now.
What You Need Before Importing A Character
Jumping straight into importing without checking a few things first is the fastest way to end up with a character that does not load, shows missing textures, or crashes Paramaker. Spend two minutes on this checklist and save yourself a headache.
Required Game Version And Updates
Always make sure your copy of Paralives is fully updated before importing any character file. Character files are tied to specific versions of Paramaker’s data structure. A character created in a newer version of the game may reference features, sliders, or clothing items that an older installation simply does not recognize. Check the game’s official update channel or launcher for the latest version before proceeding.
Downloading Character Files Safely
Download character files only from trusted sources. Community platforms like the official Paralives Discord, dedicated Paralives subreddits, and creator pages that are verified by the community are your safest options. Avoid downloading character packages from random file-sharing sites or links posted without context. A legitimate Para file will be small in size, typically just a few kilobytes, since it stores data rather than assets. Any file that is unusually large or comes packaged with an executable file should be treated with suspicion.
Checking File Compatibility Before Importing
Before moving a file into your game folder, confirm that the file format matches what Paralives currently accepts for character imports. Check the file extension against what the official Paralives documentation or community wikis list as the current supported format. If a creator has listed which version of the game they used to export the character, compare that against your installed version to catch compatibility issues before they cause problems.
Where Imported Character Files Are Stored
One of the most common reasons a character fails to show up in Paramaker is that it was placed in the wrong folder. Paralives uses a specific directory structure for custom content, and the character import folder is separate from other game data folders.
Paralives Character Import File Location Explained
On Windows, Paralives stores player data, including custom Para files, in the Documents folder rather than inside the game’s installation directory. This is a common approach for modern PC games because it keeps player-created content safe during game updates or reinstalls. Look for a folder path similar to: Documents > Paralives > Characters. This is where imported character files need to be placed for the game to detect them.
Default Custom Para Import Folder Structure
Inside the Paralives player data folder, you will typically find subfolders organized by content type. Characters have their own dedicated subfolder. When Paralives launches, it scans this folder during loading and makes any valid character files available inside Paramaker’s library. Files placed anywhere outside this specific folder will not be detected by the game, no matter how correctly they are formatted.
How To Access The Character Folder On Windows
Open File Explorer and navigate to your Documents folder. Look for a folder named Paralives. Inside it, open the Characters subfolder. If the folder does not exist yet, you may need to launch Paralives at least once so the game can generate its default folder structure automatically. Once the folder exists, this is where every downloaded Para file should be placed.
Organizing Multiple Downloaded Characters
If you plan to collect a large number of custom characters, start organizing from day one. Create subfolders inside the Characters directory labeled by creator name, character type, or theme. For example, a folder named “Community Creators” and another named “Family Saves” keep things manageable. Note that Paralives reads all files within the main Characters folder regardless of subfolders, so organization is purely for your own file management rather than a functional game requirement.
Import Character Files
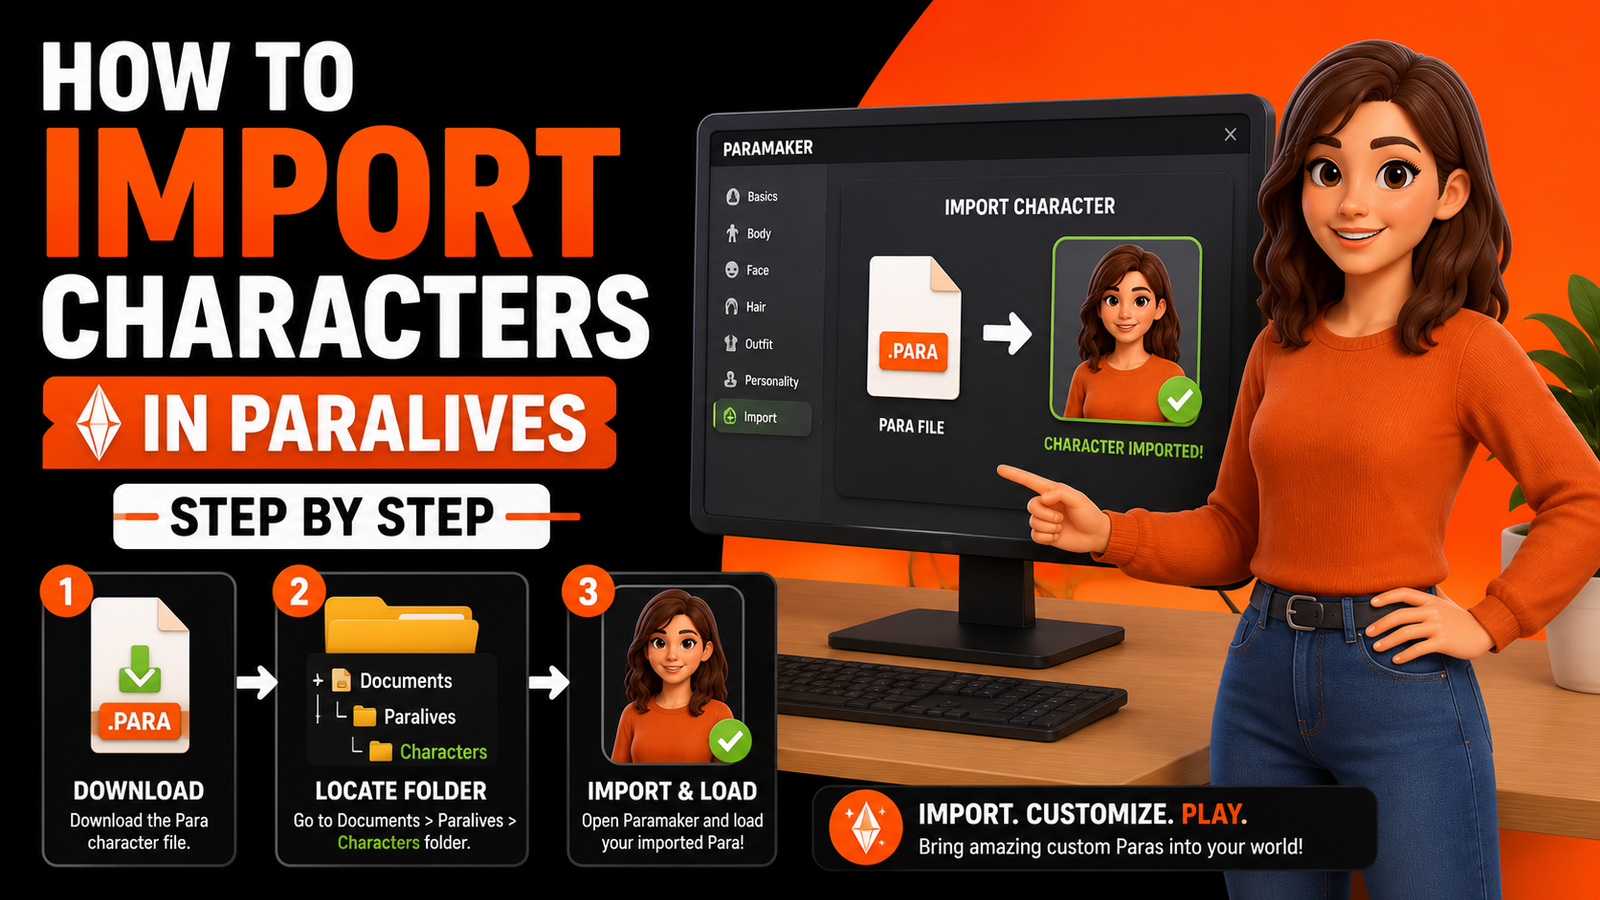
How To Import Characters In Paralives (Step By Step)
Here is exactly how to import characters in Paralives from start to finish. Follow each step in order, and the process takes less than five minutes.
Step 1: Download The Shared Para File
Find the character you want to import from a trusted community source and download the file to your computer. Save it somewhere easy to find, like your Downloads folder, before moving it anywhere else.
Step 2: Locate The Correct Paralives Import Folder
Open File Explorer and go to Documents > Paralives > Characters. If this path does not exist, launch Paralives once, exit the game, and check again. The game creates this folder structure on its first launch.
Step 3: Move The Character File Into The Folder
Copy or move the downloaded Para file from your Downloads folder into the Characters folder you just located. Do not rename the file unless you are certain the filename does not affect how Paralives reads it. Keep the original filename intact to avoid any content maintenance issues.
Step 4: Launch Paralives
Start the game normally through your launcher or Steam. Paralives scans the Characters folder during the loading process, so the file you placed there will be detected automatically as long as it is in the correct location and format.
Step 5: Open Paramaker
From the main menu, open Paramaker. This is Paralives’ character editor and the place where imported Paras are managed, edited, and deployed into your saves. Paramaker is also where you will confirm whether the import worked correctly.
Step 6: Load The Imported Character
Inside Paramaker, navigate to the character library or the import section. You should see your newly imported Para listed alongside any characters you have previously created. Select it to load the full character with all its original appearance settings intact.
Step 7: Save The Character To Your Library
Once the character is loaded in Paramaker, save it to your personal library if that option is available. This step ensures the character is properly registered in your game configuration and ready to be added to any household or save you choose.
How To Load A Shared Character File In Paramaker
Loading a shared character file is slightly different from the import process. Importing moves the file into your game folder. Loading is what happens inside Paramaker once the file is already in place.
Opening The Character Library
Inside Paramaker, look for a library or gallery panel. This is where all available characters, both ones you created and ones you imported, are displayed. If you just placed a new file in the Characters folder, it should appear here after launching the game.
Finding Newly Imported Paras
Newly imported Paras may appear at the end of your character list or in a separate section, depending on how Paramaker organizes content. If you cannot spot it immediately, use any available search or filter function to look for characters by name, as the filename often becomes the character’s display name inside the library.
Editing Imported Characters Before Playing
One of the best things about Paralives’ avatar customization workflow is that nothing about an imported character is locked. Once a Para is loaded in Paramaker, you can edit every aspect of their appearance, adjust personality traits, change clothing, and save those changes as a new variation without altering the original file. This makes imported characters a starting point rather than a fixed asset.
Saving Customized Versions
After editing an imported Para, save the customized version under a new name. This preserves the original import in its unchanged state in case you want to revert or share it, while giving you a personalized version ready for gameplay.
How To Add Custom Characters In Paralives
Adding custom characters to Paralives covers more than just the basic import process. Understanding the full scope of how player-created content works in the game gives you more control over your character collection management.
Importing Single Characters
Importing a single character follows the seven steps above. One file, one Para, done in under five minutes. This is the most common workflow for players who download characters one at a time from creators they follow.
Importing Multiple Paras At Once
To import multiple Paras at once, simply place all the character files into the Characters folder before launching the game. Paralives scans the entire folder on startup, so every valid file present at launch time will be available in Paramaker. There is no limit stated on how many characters you can import in a single session.
Managing Custom Character Collections
As your library grows, a system for managing it becomes necessary. Keep a simple text document listing your imported characters, where you downloaded them from, and which version of the game they were created in. This reference document saves significant time when you need to troubleshoot a character that stops loading after a game update.
Creating A Personal Character Library
Over time, your imported characters, combined with the original Paras you create yourself, form a personal character library. Treat it like a collection. Organize it, back it up, and keep it current. A well-maintained character library makes starting new saves faster and more enjoyable because you always have a roster of ready-made Paras to populate your world with.
Importing Characters From Friends And Community Creators
Imagine your friend spent three hours building the perfect Para based on a shared character concept you both designed together. They send you the file. You want to drop it directly into your save and start playing together. That is exactly the kind of scenario Paralives’ sharing system is built for, and it works cleanly when both players follow the same process.
Sharing Paras With Other Players
To share a Para, locate the character’s file in your Characters folder and send it directly to the other player via Discord, email, or any file transfer method. No special packaging is required. A single file is all that needs to change hands.
Using Community Character Downloads
Community platforms for Paralives character sharing are still developing as the game builds its player base. Early community hubs include the official Paralives Discord server and fan-run Reddit communities where creators post their character files for free download. As the game grows post-launch, dedicated sites similar to The Sims Resource for Sims content will likely emerge.
Best Practices For Character Sharing
When sharing a Para publicly, include the version of Paralives you used to create it, a screenshot of the character so recipients know what to expect, and any notes about custom content dependencies if applicable. This small amount of documentation dramatically reduces the number of “why does it look different on my game” messages you will receive.
Avoiding Broken Or Incomplete Files
A broken character file usually results from an interrupted download or a file that was exported from an incompatible version. Always verify that a downloaded file is complete by checking its size against what the creator listed, if that information is available. If a character fails to load, try re-downloading from the original source before spending time on troubleshooting.
Customizing Imported Paras After Installation
An imported Para is not a finished product. It is a starting point. Paramaker gives you full access to every aspect of the character after import, so personalizing downloaded characters is a natural part of the workflow.
Editing Appearance In Paramaker
Load the imported Para in Paramaker and use the same sliders and tools you would use to create a character from scratch. Every body proportion, facial feature, hairstyle, and clothing choice is fully editable. Nothing about an imported character is locked or protected.
Adjusting Personality Traits
Personality traits affect how a Para behaves autonomously during gameplay, so adjusting them after import is often the most important customization step. A character downloaded from a community creator will come with whatever traits that creator assigned. Swap them out to match the role you want the character to play in your save.
Modifying Clothing And Accessories
Clothing and accessories on imported characters can be changed completely in Paramaker. If the original creator used a clothing style that does not match your save’s aesthetic, replace it without affecting any other aspect of the character’s appearance.
Saving New Character Variations
Save edited versions under new names to build variations of the same base character. A creator might share a character in casual clothing. You save a formal version, a sleepwear version, and a winter version. Each one lives in your library as its own entry, all derived from the original import.
Import Errors Fixed
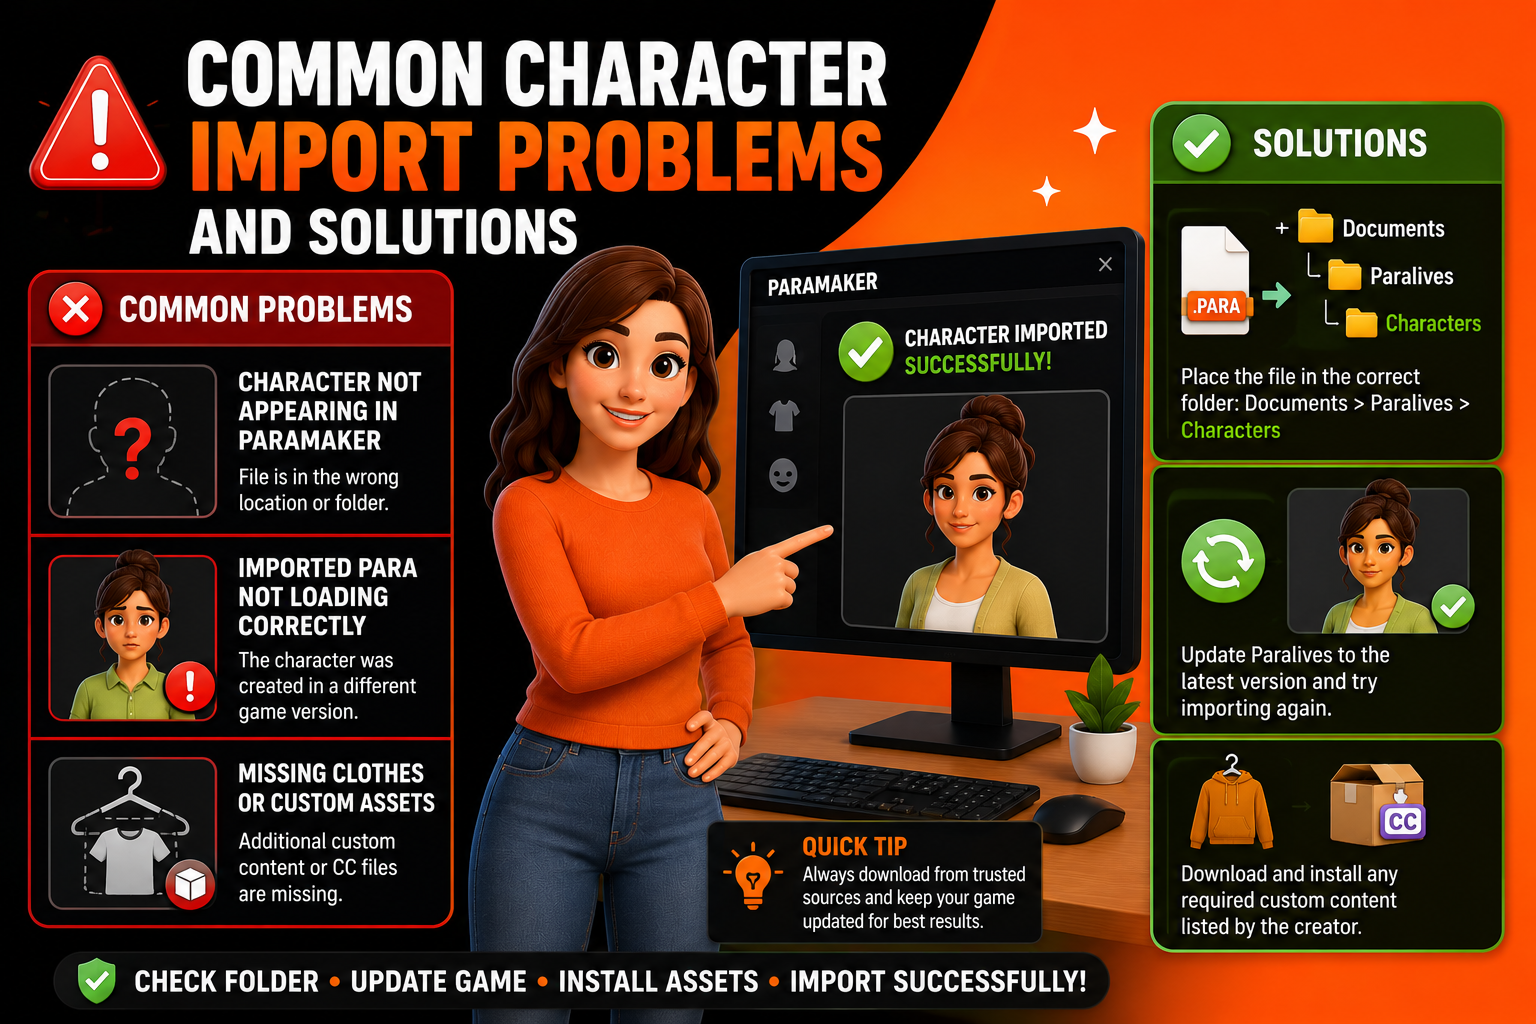
Common Character Import Problems And Solutions
| Problem | Most Likely Cause | Solution |
| Character not appearing in Paramaker | Wrong folder location | Move file to Documents > Paralives > Characters |
| Para loads but looks wrong | Version mismatch | Update the game or re-download from the creator |
| Missing clothing or assets | Custom content dependency | Check if extra files are needed |
| Corrupted file error | Incomplete download | Re-download from the original source |
| Duplicate character shown | File imported twice | Remove one copy from the folder |
| Game crashes on load | Incompatible file format | Verify file extension matches the current supported format |
Character Not Appearing In Paramaker
This is almost always a folder placement issue. Double-check that the file is inside Documents > Paralives > Characters and not inside the game’s installation directory or a subfolder that Paralives does not scan.
Imported Para Not Loading Correctly
If the character loads but proportions or clothing look wrong, the file was likely created in a different version of Paralives. Check for a game update and try loading again after updating.
Missing Clothes Or Custom Assets
Some community-created characters depend on additional custom content files beyond the character file itself. If a creator used non-standard clothing assets, those files may need to be installed separately. Check the creator’s original post for any listed dependencies.
Corrupted Character Files
A corrupted file usually means the download was interrupted or the file was damaged in transit. Delete the corrupted file from your Characters folder and download a fresh copy from the original source.
Version Compatibility Issues
Version compatibility is the most common technical issue with imported characters. Always check what version of Paralives a character was created in. Files from significantly older versions may not load correctly in current releases due to changes in Paramaker’s data structure.
Duplicate Character Errors
If the same character appears twice in Paramaker, you likely placed two copies of the same file in the Characters folder, possibly under slightly different filenames. Remove one copy and restart the game.
Paralives Character Not Loading? Complete Troubleshooting Guide
Verify Folder Placement
Open Documents > Paralives > Characters and confirm the file is there. Not inside a subfolder. Not in the game’s installation directory. The root Characters folder is the only location the game scans.
Check File Format Requirements
Confirm the file extension matches the format Paralives currently accepts. This information is available in the official Paralives support documentation and community wikis. An incorrectly formatted file will never load, regardless of where it is placed.
Update Paralives To The Latest Version
Run a full game update through your launcher before trying to import again. Many loading failures that appear to be file problems are actually version-mismatch issues resolved by a simple update.
Remove Conflicting Files
If multiple character files share similar filenames or if there are corrupted files in the Characters folder alongside the one you are trying to load, they can interfere with each other. Remove all files except the one you want to test, confirm it loads, then add others back one at a time.
Reinstall The Character File
Delete the file from the Characters folder, restart Paralives to clear the cache, exit the game again, and then place a fresh copy of the file back in the folder before relaunching. This sequence resolves a surprising number of stubborn loading failures.
Test With A Different Shared Character
If you have tried everything and a character still will not load, test with a different character file from a different source. If the new file loads correctly, the original file itself is the problem. If no files load, the issue is with your folder setup or game installation.
Tips For Managing Large Numbers Of Imported Characters
Creating Backup Copies
Before any major game update, copy your entire Characters folder to an external drive or cloud storage. Updates occasionally change folder structures or file format requirements, and having a backup means you never permanently lose a character you spent time finding or creating.
Using Folder Categories
Create subfolders inside your Characters folder for personal organization. Labels like “Community Downloads,” “Original Creations,” and “Friends’ Paras” make finding specific characters fast without scrolling through hundreds of entries.
Removing Unused Characters
Periodically review your character library and remove Paras you no longer use. A leaner library loads faster and is easier to navigate. Archive removed characters to a backup folder rather than deleting them permanently in case you want them later.
Maintaining Faster Load Times
Paralives scans the Characters folder every time you launch the game. An extremely large number of files in that folder can slow down the initial load process. Keeping only active characters in the main folder and archiving the rest is a good habit that keeps the game feeling snappy.
How To Share Your Own Para With Other Players
Exporting A Character
In Paramaker, load the character you want to share and use the export function to save the character as a file. Paralives places the exported file in your Characters folder by default. Locate it, and it is ready to share.
Packaging Files Correctly
For most characters, a single exported file is all you need to share. If your Para uses any custom content that other players would also need, document those dependencies clearly so recipients know what to install alongside the character file.
Sharing Through Community Platforms
Post your Para on the official Paralives Discord, relevant subreddits, or any Paralives fan community you participate in. Include a screenshot, the game version you used, and any notes about the character’s design. Good presentation increases how many people actually download and use your creation.
Ensuring Compatibility For Other Users
Before publicly sharing a character, test it on your own installation by exporting it, deleting the entry from Paramaker, and re-importing it from scratch. If it loads cleanly for you in a fresh import, it will load cleanly for others following the same process.
Best Practices For Safe Character Downloads
Trusted Sources For Shared Paras
Stick to the official Paralives Discord, verified community subreddits, and creator pages with established reputations. New platforms will emerge as the game grows, and community moderation quality varies. When in doubt, ask in the Paralives community whether a source is trustworthy before downloading.
Avoiding Damaged Files
A legitimate Para character file should be small, a few kilobytes at most, for a standard character. Files that are unusually large or come with additional executable or archive files attached are red flags. Download only the character file itself from sources you trust.
Backing Up Saves Before Importing
Before importing any new character file, back up your Paralives save data. This is especially important when importing files from sources you have not used before. A corrupted or incompatible file is unlikely to damage a save, but having a backup removes any risk entirely.
Keeping Your Character Library Organized
A well-organized library makes the entire character import process faster and more enjoyable over the long term. Spend a few minutes after each importing session keeping your folder tidy. It is a small habit that pays off every time you open Paramaker.
Beginner Mistakes To Avoid When Importing Characters
Using The Wrong Folder
Placing files in the game’s installation directory instead of the Documents folder is the single most common beginner mistake. Always use Documents > Paralives > Characters. Never the Steam or game files directory.
Ignoring Game Version Differences
A character file created in an older version of Paralives may not display correctly in a newer version. Always check version compatibility before importing, especially for files downloaded from older community posts.
Forgetting To Save Imported Paras
Loading an imported Para in Paramaker and then exiting without saving means the character will still be available as a file but will not be registered in your active library. Save every imported character before closing Paramaker.
Downloading Incompatible Files
Not every file shared in Paralives communities is actually a Paralives character file. Verify the file type before downloading. An incompatible file placed in the Characters folder will either be ignored by the game or generate an error on launch.
Frequently Asked Questions
How Do I Import A Character Into Paralives?
Download the Para character file, place it in Documents > Paralives > Characters, launch the game, and open Paramaker. Your imported character will appear in the character library ready to load and edit.
Where Is The Paralives Character Import Folder Located?
On Windows, the character import folder is located at Documents > Paralives > Characters. This folder is created automatically when you launch Paralives for the first time.
Why Is My Imported Para Not Showing Up In Paramaker?
The most common reason is incorrect folder placement. Confirm the file is in Documents > Paralives > Characters and not inside the game’s installation directory or a subfolder. Also, verify the file format matches what the current version of Paralives accepts.
Can I Import Multiple Custom Characters At The Same Time?
Yes. Place all character files into the Characters folder before launching the game. Paralives scans the entire folder on startup and makes all valid files available in Paramaker simultaneously.
How Do I Load A Shared Character File In Paralives?
Once the file is in the correct folder and the game is launched, open Paramaker and navigate to the character library. Your imported Para will appear there alongside characters you have created yourself.
Can I Edit Imported Paras After Importing Them?
Yes. Every aspect of an imported Para is fully editable in Paramaker, including body proportions, facial features, clothing, and personality traits. Save edited versions under new names to preserve the original.
How Do I Share My Own Para With Other Players?
Use the export function in Paramaker to save your character as a file, then send that file directly to other players or post it on community platforms like the official Paralives Discord with a screenshot and version notes.
What Should I Do If A Character File Is Corrupted Or Will Not Load?
Delete the corrupted file, restart Paralives to clear any cached data, and re-download a fresh copy from the original source. If the problem persists, check whether the file was created in a different version of the game and update Paralives if needed.
Final Thoughts:
Knowing how to import characters in Paralives properly is a skill that opens up the full community side of the game. Once you understand the folder structure, the Paramaker workflow, and the basic troubleshooting steps, importing and managing characters becomes second nature. The process is straightforward when you follow it in order, and the reward is a rich, diverse character library populated with some of the most creative Paras the community has designed. Back up your files, organize your library from the start, and download from trusted sources. Do those three things, and character importing in Paralives will never feel complicated again.